While researching my latest DIY flooring project, I discovered that most floor fitting guides are based on laminate rather than engineered wood.
As there are some critical differences, I decided to write this comprehensive guide on laying engineered wood flooring.
What Is Engineered Wood?
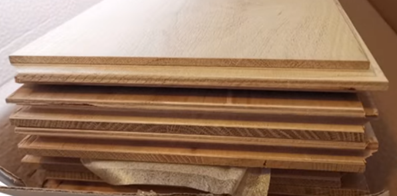
Many people, including some manufacturers, confuse engineered wood with laminate flooring. Although there are some similarities, they’re entirely different products.
Both products are multi-layered, but engineered wood comprises a thick layer of plywood with a wood veneer finish. In contrast, laminate is primarily plastic with a fibreboard base.
This construction makes engineered wood stronger than softwood floorboards. Furthermore, engineered wood flooring is more stable than solid oak because of the plywood core.
Tools and Materials
You’ll need these tools and materials to remove the existing flooring and lay the engineered wood across joists.
Tools
- Tape measure
- Claw hammer
- Utility (Stanley) knife
- Scraper
- “Tappers” (scrap pieces of boarding about 150mm long)
- Pair of flooring clamps
- Hand saw
- Crow (or pry) bar
- 38mm wood chisel
- Impact driver or drill driver if you don’t have one
- Long (0.8m–1.2m) spirit level
- Paintbrush and/or roller (for finishing)
Materials
- Engineered wood flooring
- Tongue and groove screws 3.5 x 45mm
- Joist and joint adhesive
- Floor spacers (if floor joists are uneven)
- Sandpaper (80 grit)
- Wood stain or varnish, plus beeswax if required.
Health and Safety Measures
As this task involves lifting floorboards containing nails and cutting and sanding wood before applying a finish, I recommend the following PPE.
- Dust mask
- Goggles
- Gloves
- Knee pads (most important)
How To Lay Engineered Wood Flooring
Follow the 5 steps below to lay engineered wood flooring like a pro.
Step 1: Planning the Job

Measuring
No room is perfectly square or rectangular, so taking two measurements in each direction at either end of the room is essential.
You’ll need a piece of paper, a pencil, and a tape measure for this job.
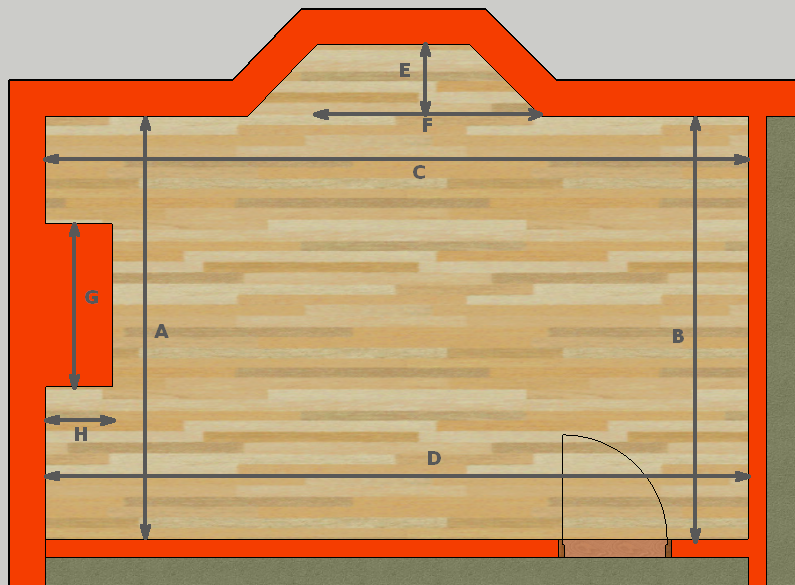
- Draw a rough plan of your room showing the profile of the walls, including doors, chimney breasts, alcoves, bay windows, etc. (see example above).
- Whether you measure wall to wall or along the floor doesn’t matter — it’s not a precise science. If there’s furniture in the way, it’s easier to measure higher up the wall, but when working alone, measuring along the floor is best.
- Measure each end of the room (A, B, C, and D) to understand how “square” the room is. For calculating the floor area, use the longest measurement each way.
- The area (square metres or m2) is simply width x length. If there are protrusions such as fireplaces or extrusions like alcoves and bay windows, measure these separately and add or subtract these from the calculated area (E x F, G x H).
- Add 10% to the area for wastage by multiplying the area by 1.1 (hence why it doesn’t need to be too precise).
Pro Tip: Digital hand-held laser measuring devices are accurate these days, especially over lengths up to 20m. They’re also suitable for measuring ceiling heights, which is handy when decorating.
Choosing the Material
Consider these factors before buying:
- Moisture and water resistance: For bathrooms and kitchens, this is especially important.
- Finish: Do you want a rustic appearance or something more modern? Will you be staining the boards, or do you want them pre-finished?
- Substrate: If laying on a suspended floor (e.g. replacing existing floorboards), you’ll need boards thick enough to span the joists. A thickness of 20mm will suit most situations, but for laying on a solid substrate, you can go down to 10mm.
- Wear layer: The thicker the wear layer, the longer the lifespan because you can repeatedly sand it down and re-varnish it.
- Board Dimensions:
- Width: This factor depends on the room size. Visually, narrower boards look better in smaller rooms. However, it’s generally quicker to lay wider boards than narrow ones. Typical widths include 100mm, 150mm and 190mm.
- Length: Packs are usually 2m to 2.4m but often include a shorter board to stagger the joints.
- Thickness: Boards range from 10mm to 25mm to suit the span across joists.
Step 2: Remove Existing Flooring
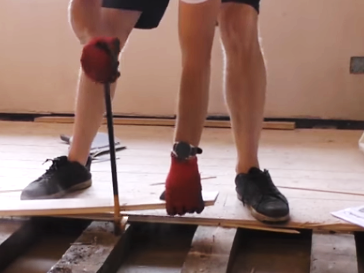
Use a crowbar to pry any existing boards from the floor joists, hopefully bringing the nails with them. Hammer down or ground off any remaining nails in the joists.
If you have laminate flooring, check out our guide to removing laminate without removing skirting. If not, remove the skirting boards in this sequence:
- Using a utility knife, cut along the junction between the wall and skirting boards and between the skirting board and any architraves. This step breaks the seal with the paint and wallpaper (if applicable), reducing potential damage to existing finishes.
- Note how the skirting is fixed at internal corners and refer to our guide on cutting skirting boards. You’ll see that one board is scribed to the adjacent board. You must remove the scribed board first.
- Slowly prise the skirting board from the wall using a crowbar, taking care not to damage the wall.
- Remove any sealant or adhesive from the wall. I recommend using a scraper rather than a utility knife, as the knife can cut into the wall.
- Remove any pins/nails, adhesive and caulking from the skirting.
- Sand the skirtings to remove old paintwork so they’re ready for re-fitting.
To avoid removing architraves around doorways, trim the bottom edge to suit the new floor thickness. Use a flat hand saw and a chisel or, if you have one, an oscillating saw for this job.
Step 3: Laying the Boards
Engineered wood is more stable than softwood and hardwood floorboards, so it isn’t affected by temperature and moisture changes.
However, before fitting, I still recommend storing boards for 48 hours in the room you’re laying them in. This step allows the boards to acclimatise to the room’s environment.
Setting Out
- Returning to your plan, divide the room’s longest width dimension by the floorboard width. For example:
- If the room’s longest width (A or B) is 4,300mm and the boards are 190mm wide, this equals 22.6 (4,300/190 = 22.6).
- 22 boards = 4,180mm, leaving 120mm left over. This space is ideal for the last length of boarding, leaving you room to scribe to the wall.
- If your walls are straight and square, start from the longest wall and work towards the door.
- Run the first board across any recesses or bay windows. You can fill those in after you’ve laid the main area.
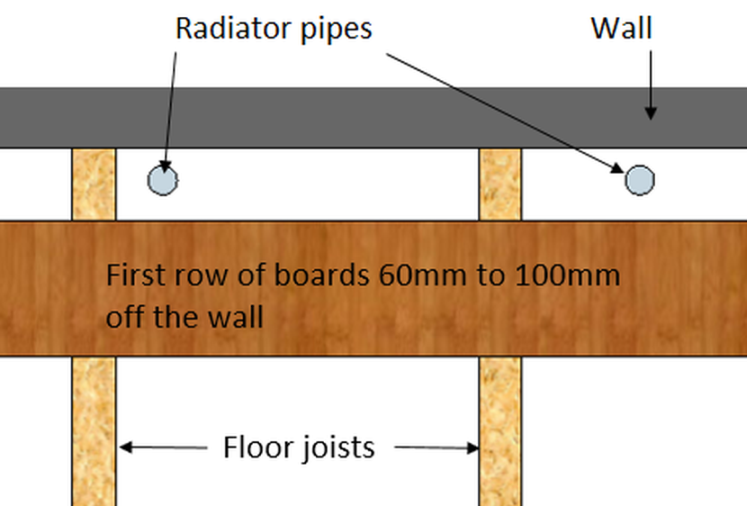
- For irregular walls, or where you have radiator pipes to contend with, set the first row of boards approximately 60mm to 100mm off the wall. This approach makes it easier to cut around the pipes and scribe to the wall.
What happens next depends on whether you have a solid or suspended floor.
Laying Boards on Suspended Floors
If you have a suspended floor, follow the sequence below. If you have a solid floor, jump to the “Laying Boards on Solid Floors” section.
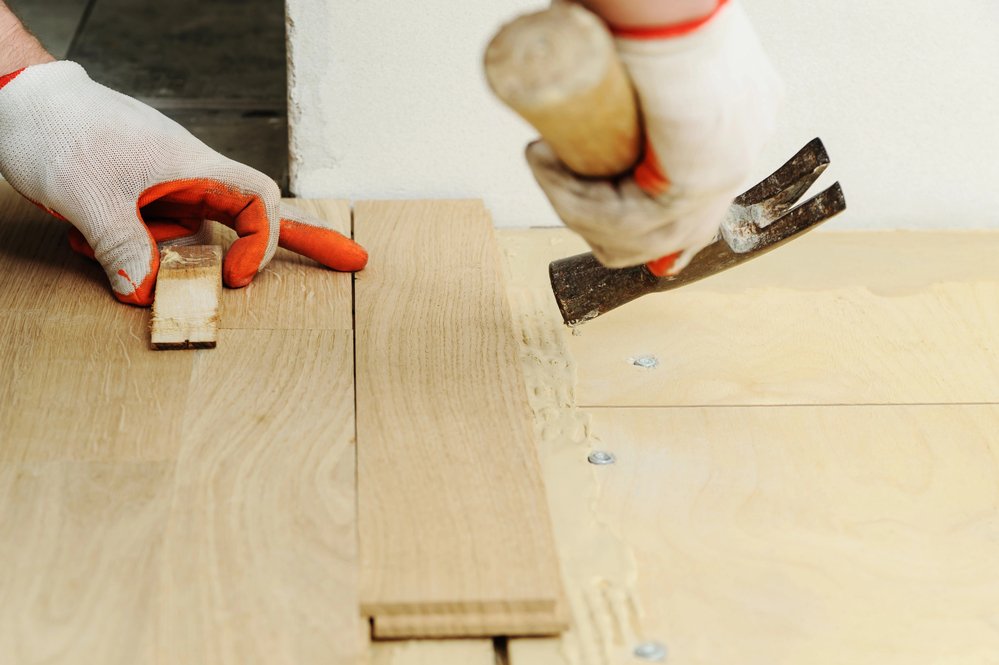
- Starting from the point you determined when setting out, lay your first board, ensuring the tongue faces away from the wall. Screw the board into each joist.
- Lay your next board, staggering the joint by 300mm. This section of our laminate flooring guide explains how best to stagger joints. It’s better to stagger joints unevenly across the floor for a more natural appearance.
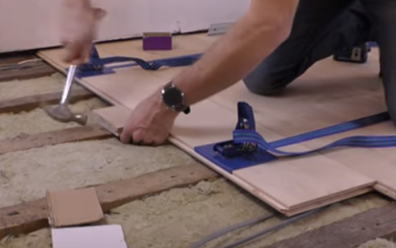
- Use the “tappers” and a hammer to tap the boards together, ensuring they fit tightly. After you’ve laid 2 or 3 lengths of board, use the clamps to pull them together. You need two clamps so they tighten evenly across the floor.
- Use packers to fill gaps between the joists and boards.
Pro Tip: Glueing boards to the joists will eliminate any springiness and provide a more solid floor.
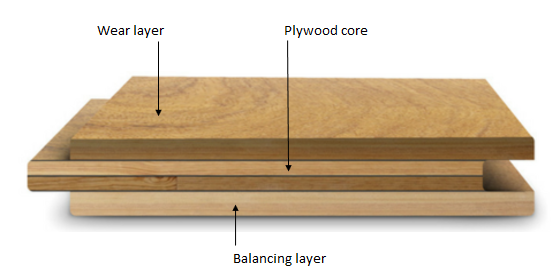
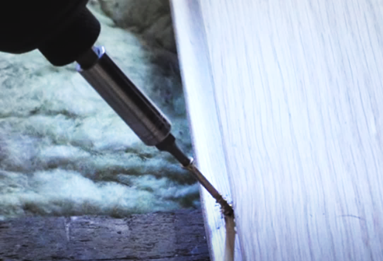
- Screw the boards into each joist through the tongue* (see image below).
- When you’ve fixed the penultimate length, you must trim the final piece to the wall.
- For shorter off-cuts, fix to at least two joists to prevent a ‘see-saw’ effect.
- When cutting holes for radiator pipes, follow these instructions in our laminate guide.
*Note: Going through the tongue hides the fixing for a much neater finish.
Laying Boards on Solid Floors
When laying on a solid floor, follow the steps in our laminate flooring instructions, which I summarise below:
- Check concrete slabs and screeds for dampness. Lay a DPM if necessary.
- Check the base is level. If necessary, lay a levelling screed.
- Floating floors work best, so use a suitable underlay.
- Set out the floorboards using the same sequence as for a suspended floor.
- Glue the tongue and groove joints, then tap and pull them together tightly.
Dealing with the Door Threshold
If you don’t already have one, fit a threshold bar across the doorway. The threshold thickness must match the boarding, and the width should match the doorframe.
You can use an offcut for this job, but remove the tongue, not the grooved edge.
To accommodate any difference in height on either side of the doorway, use a transition piece as described in our guide to laying solid wood flooring.
You may need to reduce the height of the door to accommodate the new threshold piece. Our guide to planing a door tells you exactly how to do this job.
Step 4: Re-fitting Skirting Boards
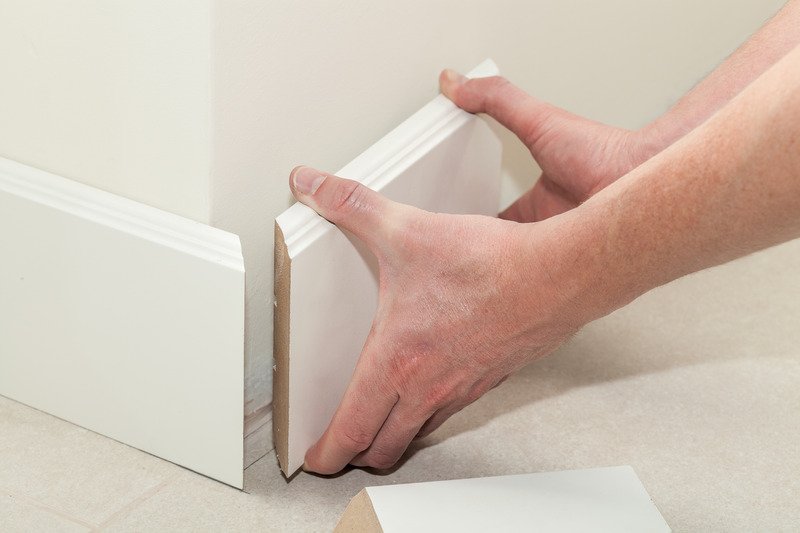
Pro Tip: This is an excellent opportunity to replace your skirting boards if you don’t want to re-fit the old ones.
Follow these steps if you want to re-fit your old skirting:
- Re-fix the skirting in the reverse order of how you removed it, but first, ensure all nails, adhesive, and sealant are removed from the boards.
- Repair any damage caused by the removal process and fill in any nail holes.
- Because your new engineered wood is probably thicker than the old flooring, it’s best to start afresh with the fixings. So, position the first skirting board in place and drill pilot holes 100mm in from the ends and at 300mm centres, top and bottom. Our guide on fixing skirting boards shows you how to do this. These holes mark the walls, so you know where to drill for the permanent fixing.
- Remove the board and use a 6mm masonry drill bit to drill into the wall at the marked points.
- Insert rawlplug fixings and tap them flush with the wall. Note: the fixing type may vary depending on the wall material (e.g. plasterboard, brick, etc.).
- For extra rigidity, apply adhesive to the back of the skirting before refixing.
- Countersink the screw holes so the screw heads are buried in the skirting board.
- Using countersunk screws, fix the boards to the wall.
- Fill the holes, sand and repaint.
Pro Tip: You may be tempted to omit the screws as many guides leave out this stage. However, with adhesive only, the skirting boards will work loose with constant battering by kids’ toys and vacuum cleaners.
Step 5: Finishing Off
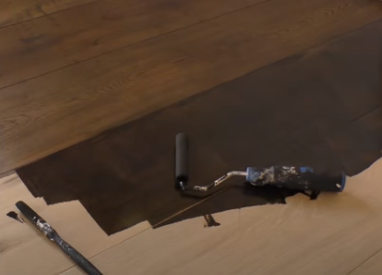
Most types of engineered wood flooring come pre-finished, but if you want to match an existing floor, buy unfinished planks and stain or varnish them yourself.
Applying a finish to wood floors protects them from abrasive wear, spillages and the sun. Yes, UV radiation will, over time, break down wood fibres, causing the surface to open up. Although this is more of an outdoor problem (e.g. decking), it can affect floorboards in brightly lit rooms as UVA rays pass through ordinary glass.
Although you can paint engineered wood, staining or varnishing provides a longer-lasting and more natural finish.
Wood Stain
When you apply stain to wood, it’s absorbed by the fibres, providing a deep protection layer while bringing out the grain.
Wood stain is better than varnish when changing the colour of wood, but you may need a finishing coat, such as beeswax, when applying it to a floor.
Varnish
Varnish is a transparent finish that protects wood from impact damage and abrasion. However, the range of colours is limited.
Oil-based varnish has a yellow tinge, whereas water-based varnish dries clear, exposing the natural wood colour.
Water-based stain or varnish works better indoors because of their low odour and quicker drying time.
Whichever product you choose, follow these steps:
- Clean the floor thoroughly with a damp cloth to remove all dust particles and allow it to dry. Note: Engineered wood comes ready for finishing, so you shouldn’t need to sand it.
- Ensure you have the proper PPE. Wear latex gloves to protect your hands and keep them clean. Knee pads are also essential.
- Stir the stain or varnish gently to avoid bubbles forming.
- Apply the stain or varnish using a brush or roller. Don’t overload it! It’s better to have 3 or 4 thin coats than 1 or 2 thick coats.
- Lightly sand between coats using 80-grit sandpaper.
- For stained floors, use beeswax. Rub in the wax using a soft, lint-free cloth in a circular motion.
If you removed the door, you may need to trim the bottom before re-fitting so it opens without scraping your new floor.
Final Thoughts
Laying engineered wood flooring is an excellent investment, and the process is straightforward if you follow these simple steps. Trust me, the resulting floor will last a lifetime if you maintain it properly.
If you want to see the whole process in action, please watch the video below:

Charlie has also produced a good video on how to stain an engineered wood floor, which I found very informative.