If you’re fitting skirting boards but don’t have a mitre saw, there are several methods you can use to cut internal and external mitre joints.
I don’t confess to being the best joiner in town, but I spent many years on building sites watching tradespeople at work, and I picked up a lot of great tips.
There are many ways of cutting mitre joints depending on your skill level, but one stands out for me as the simplest, foolproof method for all.
So, read on if you want to know how to cut skirting board without a mitre saw.
Who Needs a Mitre Saw?
Whether you choose to glue, screw or nail skirting boards to a wall, the one thing that separates the professionals from the keen DIYer is the mitre joints at corners. Cutting an angle at 45⁰ requires precision if you want to avoid excessive use of filler at the end.
You could use a mitre box, but most are less than 75mm deep, so if your skirting board is deeper than this, the mitre box is no use. Some mitre boxes have slots at 45⁰ to the horizontal, but they’re still not wide enough to fit larger skirting boards.
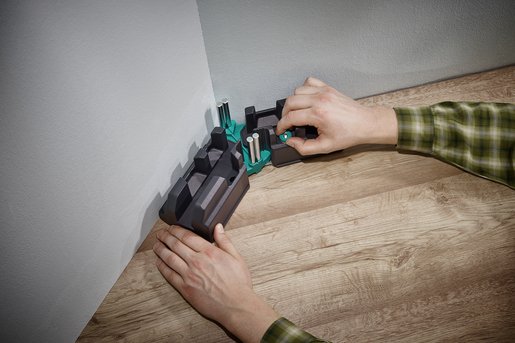
With the Wolfcraft mitre box, you set it to cut any angle, which is excellent for odd-shaped rooms, but you’re still limited in the cutting depth.
Another method I’ve seen used on building sites is carpenters using their saw blades as a mirror. I.e. in the reflection, if the skirting board is at a right angle to the piece you’re about to cut, this will give you a perfect 45⁰ cut.
The problem with this method is that you need a lot of practice to get it right. You also need a new saw with a reflective finish to cut accurately. However, if you’re interested in learning how to do this, check out this video by Preston Worktop.
My preferred method of cutting a mitre joint is to use a hand saw and a coping saw for the more delicate, detailed work. If you want to know more about saws, check out our guide to the different types of saws. Meanwhile, let’s go through the steps to get a perfect mitre cut.
Tools and Materials
Whether you use MDF or softwood skirtings is a personal choice, but softwood is more robust, whereas MDF is less prone to twisting and warping.
Tools
- Pencil
- Combination square
- Hand saw
- Coping saw
- Combi-drill
- 2.5mm drill bit
- ST10 star driver bit (usually comes with the screws)
- Small hammer (for wall plugs)
Materials
- Coarse and fine-grade sandpaper
- A short piece of dowelling (broom handle offcut will do)
- Skirting boards – for this guide, I chose a torus profile as it’s the most challenging to scribe.
- 6mm ⌀ wall plugs.
- Box of 3.5 x 50mm lost head screws. These screws by Lost-Tite are an excellent choice.
- Wood filler for the holes
- Wood glue for the joints
How To Cut Skirting Board — Step-by-Step Instructions
Follow the steps below to achieve perfect mitre joints for your skirting board.
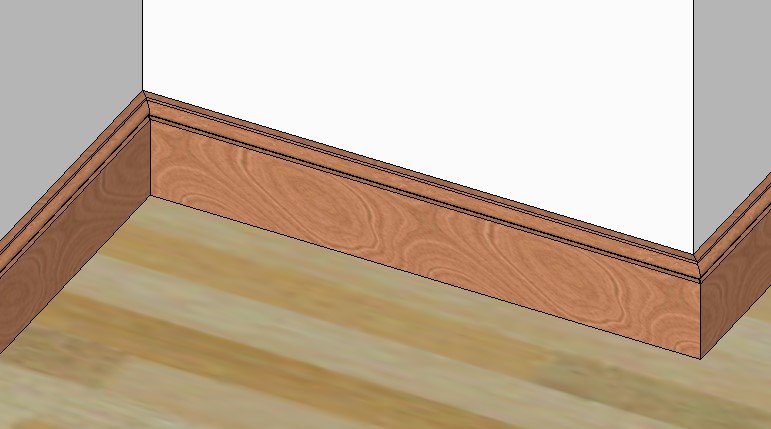
Step 1: Forming the External Mitre

Before doing anything, check the walls for their squareness with the floor. If it’s not, this will cause the skirting board to kick out at the bottom. I’ve often found it necessary to remove bits of plaster with a bolster and cold chisel.
Process:
A. Offer the skirting up to the wall projecting about 100mm past the corner. Note: you can use the offcut as a profile for marking the skirting board on the internal corner (see Step 2).
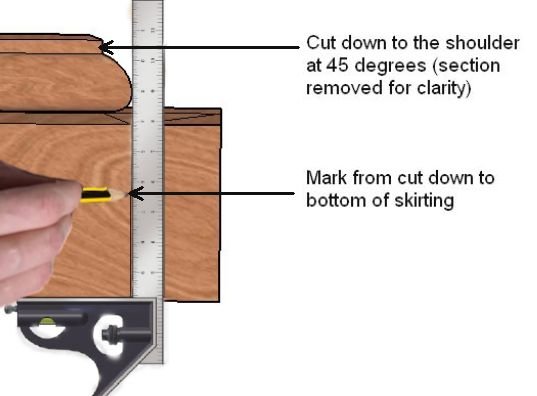
B. Draw a line on the top edge at roughly 45⁰ from the corner of the wall (see image above) to ensure you cut in the right direction (it’s easy to get confused when you take the skirting board away for cutting)
C. Use the combination square to draw a perfect 45° line over the rough line you marked in Step 1B. This line will be the final cutting line.
D. Holding the skirting firmly (in a vice if you have one), cut from the top edge along the 45° line to the bottom of the moulding, stopping at the shoulder of the profile (see image above).
Pro Tip: use short strokes to cut through the wood rather than long ones. This technique stops the saw from flexing and gives you more control.
E. Using the combination square, draw a 90⁰ line on the skirting face. This line starts from the bottom of the cut and ends at the bottom of the skirting. You mark the front because it’s essential to keep this line straight. Remember, once you fix the skirting board, this is the edge you will see, not the back.
F. Continue sawing along this line at 45°, keeping the saw horizontal, using the push stroke to cut.
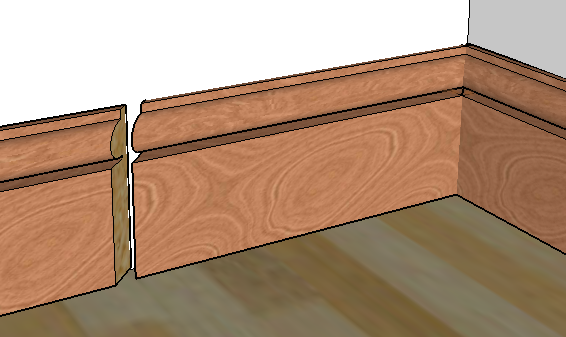
Step 2: Forming the Internal Mitre
Pro Tip: If you’re cutting MDF, use a saw with a carbon steel or induction hardened blade because the glue content in the MDF will dull a regular blade.
You can cut a complete 45⁰ mitre, but the joint won’t be perfect if the walls are not truly square. The method I prefer will work with walls that are slightly out.
Process:
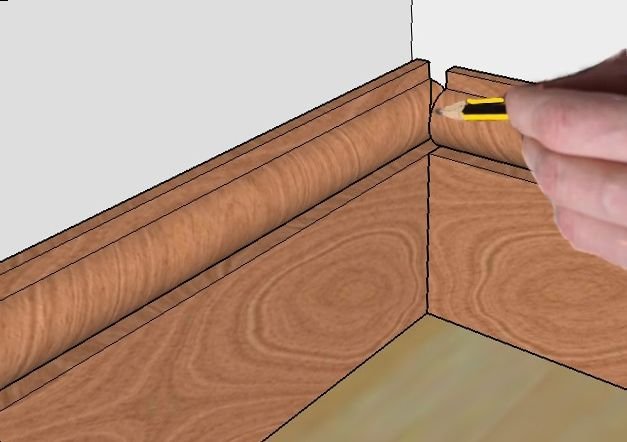
A. To mark the profile onto the piece you want to cut, use an offcut or a short length of skirting. It doesn’t matter what size, but it’s easier to hold a shorter piece. Butt this against the skirting.
B. Using a pencil, scribe around the profile of the offcut so you have the exact shape to be cut (see image above).
C. Mark along the skirting face to complete the cut line.
D. Hold the skirting firmly as before. To ensure squareness, use a combination square to check and, if necessary, correct the straight line.
E. With the skirting inverted, cut along the straight line at 90⁰, stopping at the rounded section.
F. Unscrew the coping saw handle, reset the blade to 45⁰, and tighten it up again. This adjustment will help you cut the curve.
G. Carefully cut along the pencil line from Step 2B using the coping saw.
H. Use coarse sandpaper on dowelling to smooth off any imperfections
I. Butt the skirting boards together, and you should have a perfectly snug fit. If not, a little more sanding should fix this.
Step 3: Fixing the Skirting Boards
Fixing with adhesive is okay, but it won’t form a permanent bond. The continuous impact from a vacuum cleaner or mop will eventually work it loose, so it’s always a good idea to mechanically fix the skirting board to the wall.
Process:
A. Offer the skirting board up to the wall, ensuring it fits right into the corner.
B. Drill pilot holes into the skirting using a 2.5mm drill bit. These holes mark the walls, so you know where to drill for the permanent fixing. Drill near the ends of the skirting and at around 300mm centres, top and bottom.
C. Remove the skirting and use a 6mm masonry bit to drill holes in the wall
D. Insert wall plugs into the holes in the wall, tapping in lightly with a hammer.
E. Screw the skirting boards into the wall using a star head driver bit, ensuring you bury the heads into the wood.
Pro Tip: If you’re using softwood skirting boards, save the sawdust to use as filler later. Mix this with wood glue to get a perfect colour match.
F. Fill the holes and sand down with fine-grade sandpaper.
Step 4: Joining Boards Along the Length
Skirting boards typically come in 2 to 2.4m lengths, so you must join them in larger rooms at some point. Rather than using a butt joint, use a mitred joint to provide a seamless appearance.
Process:
A. Measure the length of the wall.
B. Check the size of the skirting boards.
C. It’s better to have joints towards the corners than in the middle. So, if you have a 3m wall length and the boards are 2m long, you’ll need one full-length board and two more at 500mm each.
D. Mark the points where you want to cut and draw a line as you would for an external angle (see Steps 1B to 1D).
E. No scribing is required on in-line joints, so all you need to do is draw a 45⁰ line on the top of the board and cut down using a hand saw to the shoulder of the profile.
F. Use a combination square to draw a line at 90⁰ on the skirting face, as in Step 2E.
G. Continue sawing along this line, keeping the saw horizontal, using the push stroke to cut.
H. Apply wood glue to each face of the mitre and fix the boards to the wall as in Step 3.
I. Fill in any gaps at the joints and sand down with fine-grade sandpaper.
Final Thoughts
I hope this guide has given you the confidence to fix your skirting boards, but if you prefer a visual guide, the video below by Charlie DIYte shows you how to cut, mitre and fix skirting boards like a professional.
