In my youth, I earned money painting houses for friends & family. My auntie had a bungalow that was Tyrolean rendered several years earlier, and the render had started to crack around the window frames.
I had no choice but to fill the cracks before painting the wall. After several bags of Polyfilla, I finished the job. It wasn’t my best work, but my auntie was pleased. Since then, I’ve repaired many cracks in render and learned the proper technique from the pros.
In this DIY guide, I share everything you need to know when repairing cracks in render.
Cracks in Render Lead to Bigger Problems
You must repair cracks properly. Otherwise, rainwater gets through to the substrate and causes even more damage.
Although my first attempt at repairing render cracks wasn’t great, it did the job initially. A few years later, the cracks began to open up again, and I realised where I went wrong.
My first mistake was poor preparation. I should have done some work on the cracks before filling them. My second mistake was using the wrong filler type, which shrunk to open the cracks again.
Causes of Cracking in Render
The two leading causes of cracking in render are shrinkage and movement.
Note: Cracks can result from render detaching from the underlying bricks or blocks, typically manifesting as render patches falling away or bulging.
Shrinkage
Shrinkage can occur shortly after applying render as a part of the drying-out process. This issue typically occurs in hot weather as the render dries too quickly.
Shrinkage also occurs when water penetrates render via gaps around doors and windows, so you must also seal these areas.
Movement
Movement can result from subsidence or localised settling of the walls because of poor foundations.
While the treatment is the same, you must first understand and address the root cause to prevent cracks from reoccurring.
Repairing Cracks
Now you’ve established the cause, it’s time to repair the cracks. You can adopt several methods when repairing cracks, including a variation of my process.
If the cracks are thin, say 1–5mm, you can get away with cleaning the crack with a wire brush and using a waterproof acrylic sealant. Ronseal smooth finish exterior filler is ideal for this job because it doesn’t shrink, and you can paint over it in less than 2 hours.
I recommend following the steps below for larger cracks.
Tools & Materials
Gather all the tools and materials below before repairing render cracks.
Tools
- 18V cordless angle grinder
- Cutting disc or raking blade for masonry
- Applicator gun (geared types are best for this job)
- Filling knife
- Wire brush
- Mixing bowl (for the powdered resin)
Materials
- Several tubes of concrete repair resin (amount depends on the extent of cracking)
- Bag of masonry repair filler for wider cracks and repairs
Note: Depending on your render type, you may need other small tools for cleaning and finishing, such as:
- Sanding block
- Trowel
- Plasterer’s hawk
- Paintbrush for cleaning the cracks and applying PVA
- An old toothbrush
- Stiff yard brush head
- Wire wheel brush attachment
- Combi drill
Health and Safety Measures
For widespread repairs, a mini-scaffold is the safest option for working at heights. You should also consider wearing the following PPE:
- Facemask
- Goggles
- Ear-defenders for grinding the cracks
- Nitryl gloves for filling
How To Repair Cracks in Render — Step-by-Step Instructions
Follow the five steps below to repair cracks in render like a pro.
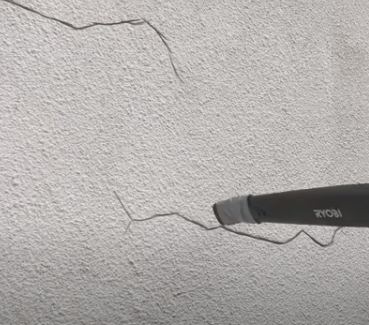
Step 1: Grind Out Cracks
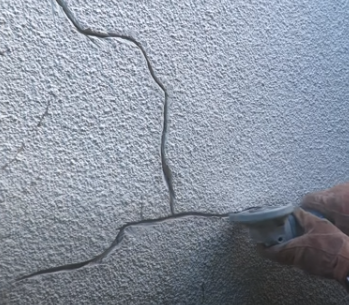
You must ground out narrow cracks to give the filler something substantial to adhere to.
- If there are signs of algae growth on the wall, clean the cracks using a masonry cleaning solution containing a fungicide.
- Attach a raking blade to your angle grinder. You could use an oscillating saw, but angle grinders are better for large areas. I recommend a diamond-tipped cutting disc because they’re hard-wearing and won’t need replacing mid-job.
- Cut along the cracks to a depth of 12mm minimum.
Step 2: Clean Cracks
Remove dust and loose render bits using a wire brush or a toothbrush. Small portable vacuum cleaners or leaf blowers are also suitable for this purpose.
Step 3: Apply Filler — Thin Cracks
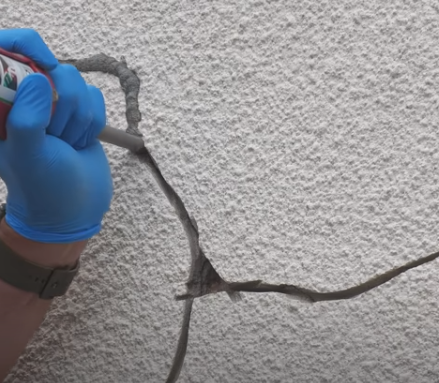
- Depending on the filler type, you may have to cut the end off the tube and attach a nozzle. In this case, cut the nozzle thickness to suit the crack width you’re filling.
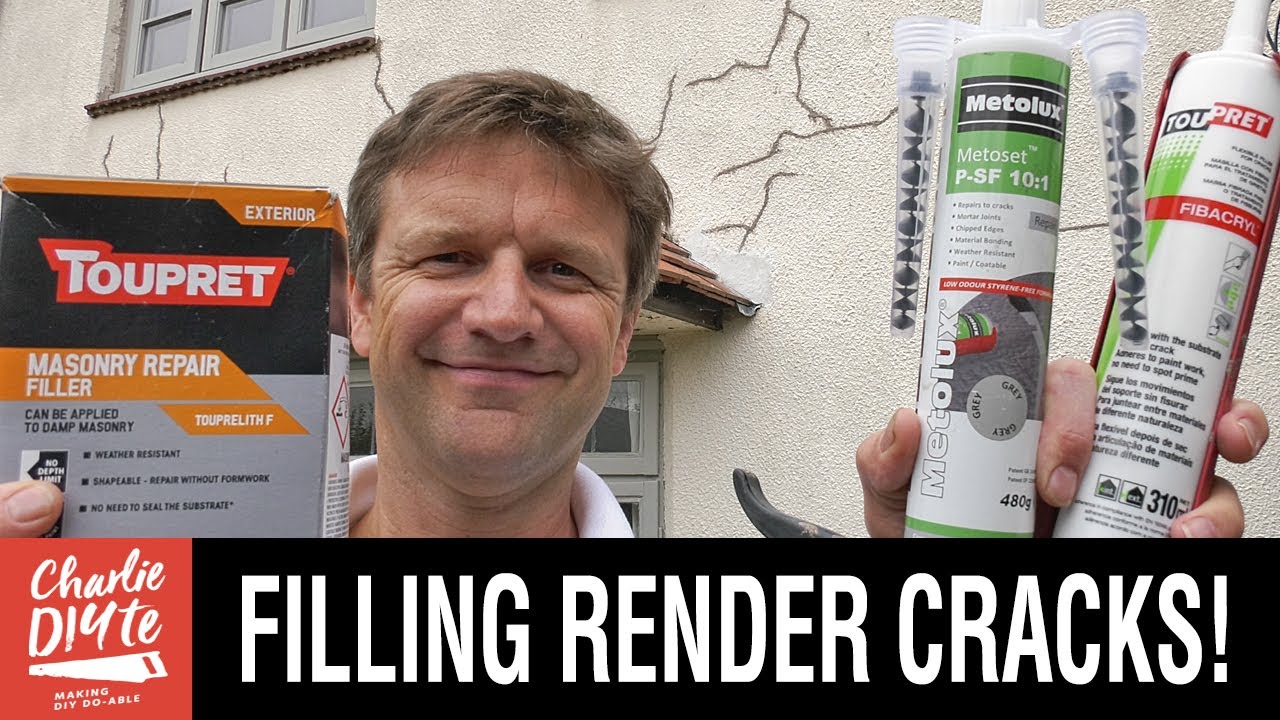
- Insert the tube of filler into the applicator. I recommend Metalux Metaset for this job. It’s a 2-part epoxy that mixes within the nozzle as you squeeze the trigger.
- Use the applicator gun to fill the cracks using firm, consistent pressure. Doing this using a geared gun is much easier, as you can set it to a specific thrust ratio of 18:1 or whatever you feel comfortable with. Although these guns are limited to 310mm tubes, they provide excellent flow control.
Step 4: Patch up Missing Render and Wide Cracks

For wide cracks or to repair patches of missing render, it’s better to use powdered resin such as Toupret masonry repair filler.
- As with any mixture, add the water to the powder and only mix what you can use in one go.
- Use a PVA emulsion to help the bonding process. Brush this into the crack or on the exposed substrate and allow it to dry (see our guide on using PVA for plastering).
- Apply the filler with pressure using a knife or trowel to ensure it bonds with the background.
Step 5: Finish Off

Use sandpaper to smooth the filled joint/patch for a flat render finish. If the render is stippled or textured, such as Tyrolean render or, worse still, pebbledash, the smooth joints will stand out. To fix this, you must work on the repair to make it blend in.
- Before the filler sets hard, use a wire brush or the filler knife to stipple the edges.
- For a lightly textured finish, use the head of a stiff yard brush to rough up the surface.
- Mix small pieces of stone into the filler for a highly textured finish. Use bits of the render that’s fallen off if you can.
- You can also use power tool attachments to get the desired effect, like this Hilka wire wheel brush.
Pro Tip: An old toothbrush is a handy tool for blending the edges of a filled crack with the surrounding render.
Final Thoughts
Any DIYer can repair cracks in render, but if the work is extensive or you’re concerned about working at height, use Rated People to find highly-rated professionals in your local area.
If you prefer to see a video of this process, I highly recommend the one below by Charlie DIYte.
For tips and advice on how to paint your wall after repairing the cracks, check out our guide to painting a house exterior.