
The bandsaw is a real workhorse in anyone’s tool collection, and it’s often underused or misunderstood.
It’s great for long rip-cuts and repetitive work, but it’s also a machine that needs very little maintenance, and you can use it for a variety of jobs, including detailed work such as; forming dovetail joints, dimensioning large sections of wood down to smaller sections, cross-cuts, and curved cuts for profiles.
Once I discovered how versatile a bandsaw is, I couldn’t be without it, and it now takes pride of place in my home workshop. Read on to find out how to use a bandsaw like a pro.
What Do You Need to Know About Bandsaws?
There are three types of bandsaws: floor-mounted, bench-mounted, and hand-held.
Floor and bench-mounted bandsaws are ideal for continuous, repetitive sawing, whereas hand-held types are better for cutting larger pieces, like pipes for plumbing and metalwork.
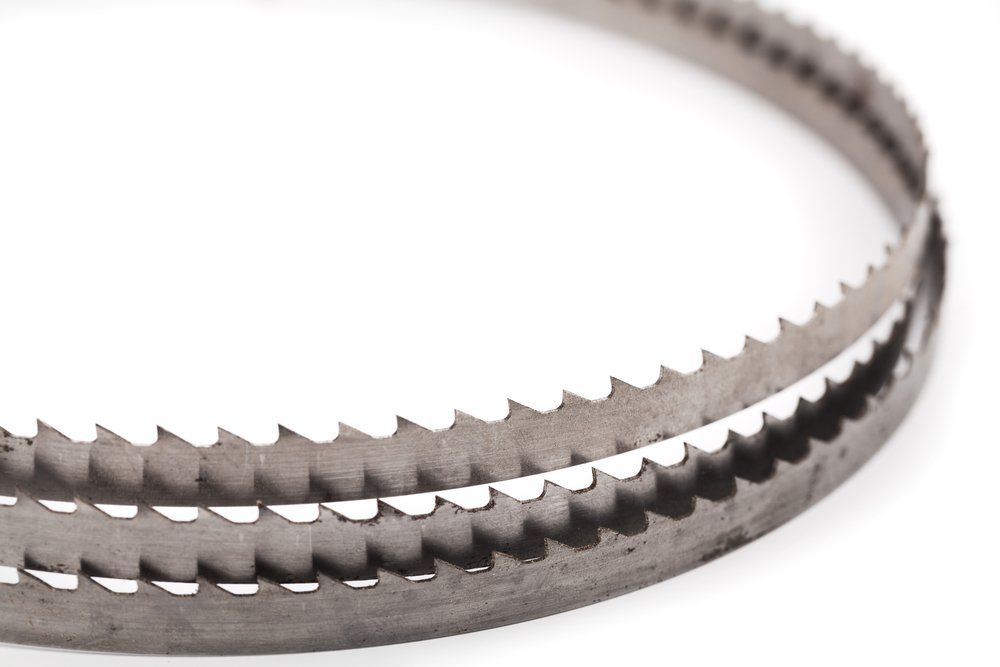
The one thing that links all bandsaws is the blade…
Choice of Blade
Choosing the right blade for the job is crucial to successfully using a bandsaw.
Bandsaws differ from all other saws in that the blade is continuous and works only in one direction. Therefore, it only cuts on the push stroke.
Below are the key factors to consider when deciding on the blade for your next project.
Width
Wider blades are stronger and won’t flex as easily when used.
The width also affects the minimum radius you can cut — the narrower the blade, the tighter the radius. Wider blades are better for straight cuts because there is less tendency for ‘wander’.
| Blade Width | Minimum Radius |
|---|---|
| 13mm | 63mm |
| 10mm | 27mm |
| 6mm | 19mm |
| 5mm | 13mm |
| 3mm | 10mm |
Tooth Pitch
As with all saws, blades are measured in teeth per inch (TPI).
A standard blade has regular teeth set at 10 TPI upwards and often has alternating teeth pointing in opposite directions to give a slightly wider cut (the kerf). This feature prevents the blade from binding with the piece you’re cutting.
The more teeth, the finer the cut, but you’re cutting thickness is limited. With a 14+ TPI blade, the maximum thickness of wood is 25mm, but at slow speeds, these are excellent for cutting non-ferrous metals and plastics.
Blades with less than 10 TPI are known as skip tooth blades, ideal for thicker wood pieces and cross-cutting.
| Pitch (TPI) | Usage | Finish |
|---|---|---|
| 3 | Deep rip-cutting wood. | Rough-sawn finish |
| 4 and 6 | Rip-cutting and cross-cutting wood. | Reasonable sawn finish |
| 10 | Plywood, MDF, non-ferrous metals, and plastics | Good finish |
| 14 | Plywood, MDF, non-ferrous metals, and plastics | Immaculate cut |
| 24 and 32 | Thin-walled brass, aluminium, and copper. The blade must have hardened teeth for this. | Fine |
Blades are also available with variable tooth pitches (4+6, 6+10, and 10+14) for a wider range of applications. The varying pitch of these blades interrupts the sawing rhythm and reduces harmonic vibration, which results in a better cut, particularly when cutting odd-shaped pieces.
Optimum Width and Pitch
Changing bandsaw blades is tricky and can take up to 30 minutes to complete because you have to reset the tracking, tension, and blade guides.
Experience has taught me that the best blade for most common usage is a 10mm wide, 4 TPI standard blade. This blade can cut fairly tight curves (27mm) and is good enough for most rip and cross cuts and resawing.
The following table shows the best width and pitch (TPI) for different types of material and effects.
| Width | TPI | Usage |
|---|---|---|
| 3-5mm | 10-14 | Cutting tight curves (less than 16mm radius) and delicate, thin materials. |
| 6-10mm | 6 | Cutting curves greater than 16mm radius, or when cut quality matters more than speed, |
| 13mm or wider | 3 | For general ripping and crosscutting, resawing, and cutting green (undried) wood |
Blade Material
Standard blades are made from carbon steel which is good for cutting wood and softer metals like brass, aluminium, and copper. Most new bandsaws come pre-fitted with a carbon steel blade.
Bi-metallic blades are good utility blades for a range of applications. The blade backing is made of flexible spring steel, and the cutting edge is cobalt high-speed steel. The two sections are welded together to form a single blade, ideal for cutting hardwood.
For specialised applications such as cutting cardboard, plastics, steel, or even meat, tungsten carbide-tipped blades are the best because of their high heat resistance and durability.
The toothless carbide grit-edged blade is the one to choose for cutting glass, ceramics, and other tiles. However, it’s probably not worth changing the standard blade for only a few tiles — electric tile saws or manual tile cutters are better for this job.
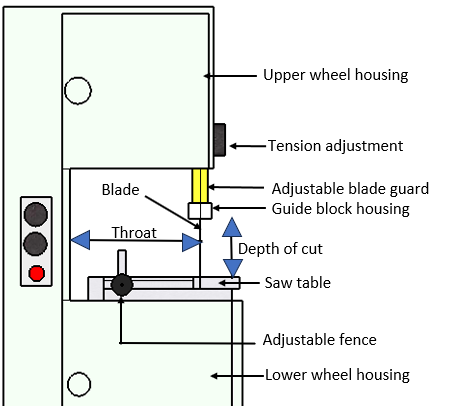
Depth of Cut and Width of Cut
Two factors determine the maximum material size you can cut on a bandsaw — depth of cut and width of cut (throat).
Depth of cut
The maximum depth of cut is the distance between the guide block housing and the saw table.
You can raise and lower the guide blocks and blade guard to accommodate the thickness of the stock (i.e., the material you’re working on). To save yourself from potential injury, don’t expose the whole blade, just enough to complete the cut.
Width of cut
Known as the throat, this is the distance between the back casing and the blade. You can remove the adjustable fence for wider stock.
Tools and Materials
You’ll need the following tools and materials to maintain your bandsaw.
Tools
- Set square or combination square
- Allan key for the guide blocks
- Paintbrush for cleaning
Materials
- Lubricant for the guide bearings
Health and Safety Measures
The major hazard of setting up and using a bandsaw is the long blade, which runs continuously around two-wheel drives. The teeth are incredibly sharp, so always wear gloves when handling the blade and ensure the bandsaw is unplugged.
How To Use A Bandsaw — Step-by-Step Instructions
If you want to use a bandsaw like a pro, follow the 5 steps below.
Step 1: Setting up the Blade
This step is the most critical part of setting up a bandsaw for use, and it’s essential (but not difficult) to get it right. Follow the sequence below while also referring to the manual/instructions.
Replacing the Blade
- Unplug the bandsaw — never work on a bandsaw that’s plugged in.
- Open the top and bottom cabinet doors and the side panel to view the entire blade.
- Release the blade tensioner. Some bandsaws have a lever, but others need unscrewing.
- Remove the old blade using the technique below. If you’re struggling, watch this Paul Sellers video.
- Cross your arms and twist the blade into a figure 8.
- Fold the figure 8 in half.
- Tie up the now circular blade for storage or safe disposal.
- Loop the new blade onto the bottom wheel and roll it onto the top, ensuring the teeth face you and are pointing down.
- Tighten the blade tensioner, not fully, just enough to take up the slack.
- You must get the blade in the middle of the wheels, so starting at the top, position it by hand. It’s a good idea to use clamps to hold it in place while you work on the bottom wheel.
- Moving to the bottom wheel, position the blade as centrally as possible. There will be room for fine adjustments at the end of this process.
- Tension the blade to suit the width. Allow about 9mm of movement in the blade (less for wider blades).
- Ensure the blade runs centrally on both wheels by spinning them manually and using the tracking adjuster at the back of the wheel.
Adjust the Guides
Now the blade is in place, you must adjust the guides in the blade guard and below the saw table. Start at the top.
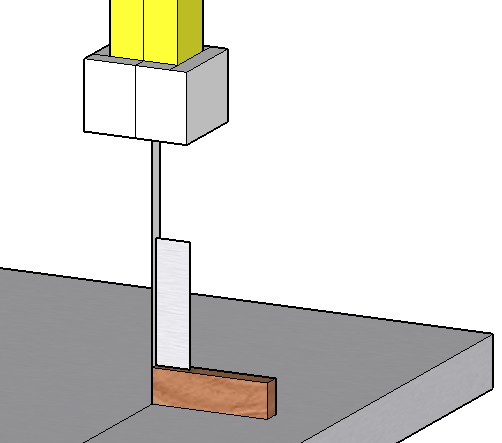
- Loosen the locking bolt on the guide block at the back of the blade and set it so the gap is about the thickness of a credit card between the block and the blade. Use an Allan key for this job.
- Do the same with the guide blocks on each side of the blade. The aim is to get the blocks as close to the blade as possible without touching it — 1mm will suffice.
- Ease the side guides back to align with the blade gullets, NOT THE TEETH. You will ruin the blade if the teeth touch the guide blocks during use.
- Tighten the locking bolts when the gaps are sufficient and aligned with the blade.
- You should have a similar setup beneath the saw table, so adjust these guides similarly (you can remove the table for easy access).
Adjust the Table and Fence
Now you need to ensure that the table is square with the blade.
- Use a set square to check that the blade is 90⁰ to the saw table. If not, adjust the table using the tilting mechanism underneath — check your manual for details.
- Loosen the locking knob on the adjustable fence and use a set square to check and adjust for squareness. Tighten the locking knob when everything is fine.
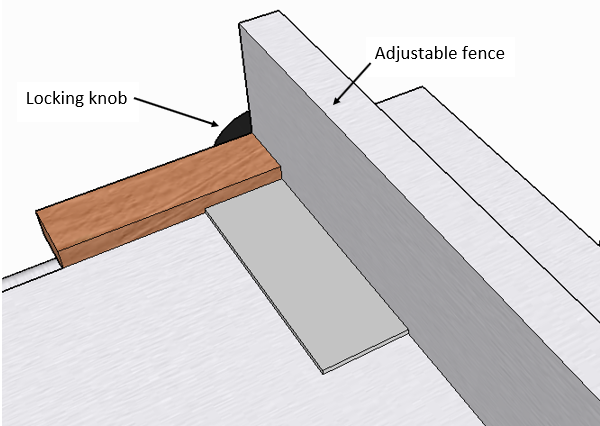
- Move the fence against the blade to ensure it’s square against it. You can make adjustments through the fence rail if it’s not. Always tighten up any bolts when done.
Pro-Tip: Extend the life of your blades by releasing the tension whenever your saw sits idle for three days or more.
Note: When cutting metal, lubricate the blade to prevent it from overheating. If you then go on to cut wood, wipe the blade clean to prevent staining.
Step 2: Cutting Straight Lines
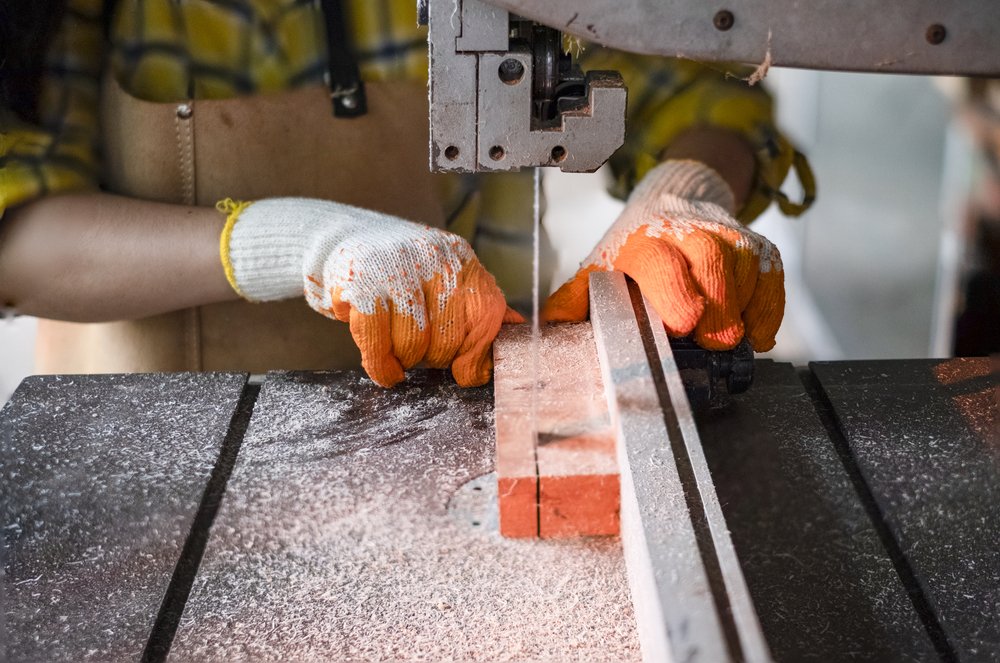
Cutting straight lines is effortless on a bandsaw, provided you use the correct blade. Use a 13mm blade for rip cutting with 3 TPI, and then follow the steps below:
- Set the blade guard to around 13mm above the stock.
- Adjust the fence to match the stock thickness.
- Set the cutting speed. The thicker the piece, the slower the speed.
- Turn on the motor and gently push the stock against the blade.
- Complete all cuts in one push.
Pro tip: To eliminate saw marks on the stock, cut on the outside edge of your line, leaving some material to sand down.
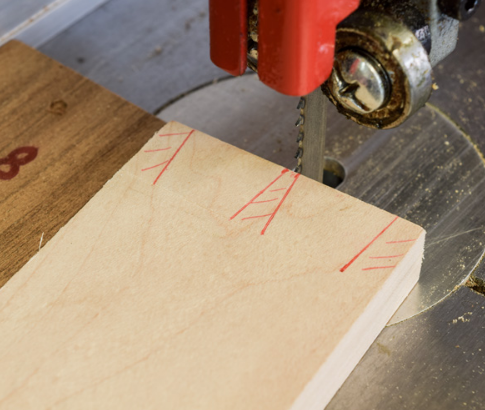
Step 3: Cutting Curves
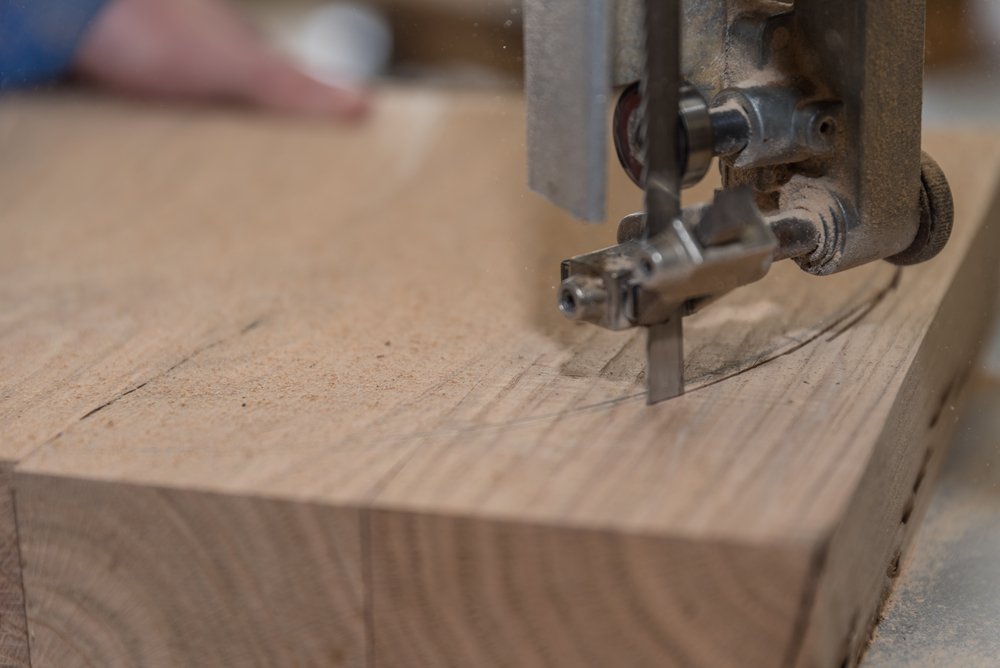
You may need to change the blade for cutting curves. Refer to tables 1 to 3 for the right blade.
- Turn on the motor and offer the stock up to the blade, as described in step 1.
- Maintain a steady feed rate as you follow the curve and keep your stance the same as you work through the piece.
- Cut to or slightly outside the line — you can always sand down to the line later.
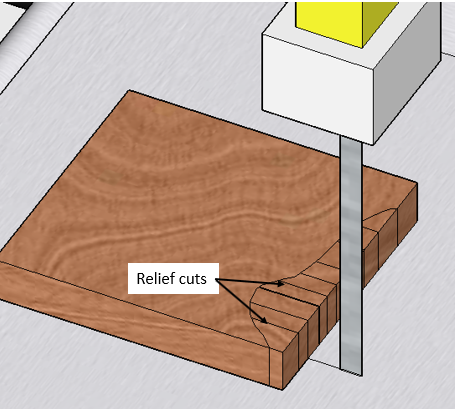
- Make multiple relief cuts to the contour line for tight or long continuous contours.
- Cut along the contour line so the material falls away as you pass the relief cuts.
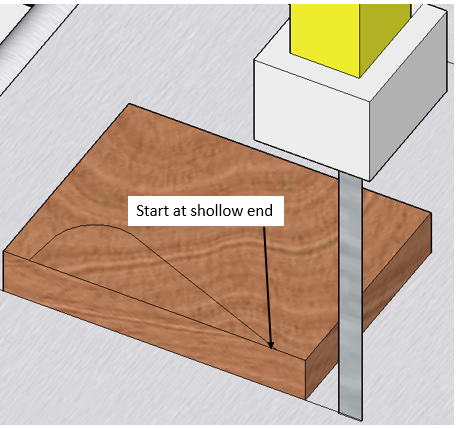
Pro-Tip: For contoured cuts, start at the shallowest angle. If both ends are shallow, cut in from each end towards the middle. This approach prevents the piece from “feathering” as you reach the end.
Step 4: Detailed Work
The finest joints, such as dovetails, can be cut using a bandsaw. This video by Matthias Wandel shows you one way to do it, and this article by Fine Woodworking shows you another method.
The tilt feature on most saw tables can also help create shapes and cuts up to 45⁰ in the vertical plane.
Another great accessory for your bandsaw is the mitre block which attaches to the table and enables you to make cuts up to 45⁰ horizontally.
For this detailed work, using a 3 to 5mm blade with 10 to 14 TPI is best. See Table 4 below for typical speeds, but always follow the manufacturer’s recommendations.
| Speed (m/min) | Material |
|---|---|
| 1,500 | Most types of wood under 50mm thick |
| 1,200 | Most types of wood over 50mm thick |
| 90-120 | Aluminium |
| 70-80 | Mild steel |
| 30-40 | Stainless steel |
Pro Tip: The bandsaw may be cumbersome for detailed work, so we recommend using a scroll saw instead.
Step 5: Maintaining Your Bandsaw
To keep your bandsaw in good order, you must occasionally strip it down and clean off the build-up of sawdust and plastic or metal shavings that accumulate around the wheels and guide blocks.
This video by Axminster Tools shows you how to do this, but below are the key steps:
- Open up the wheel casings and remove the blade.
- The wheels usually have a rubber track around them, so to remove any debris, use an old, blunt blade or a kitchen knife — nothing too sharp to damage the rubber — and place this against the wheel while you rotate it by hand.
- Cleaning the guide blocks is much easier if you remove the saw table.
- Use a brush to remove any debris from the guide blocks. You may need your knife or blade to remove any larger bits lodged there.
- Loosen the top and bottom guides and pull them outwards so they’re well away from the blade before you refit it.
- Fit/refit the blade. If you’re refitting the old one, check it for any kinks, cracks, or debris that can build up in the gullets. Follow the sequence in Step 1.
- Refit the saw table and check for squareness as in Step 1.
As for anything with moving parts, a little lubrication is also necessary. A drop of vegetable oil on the guide bearings keeps them running smoothly.
For anything to do with the wheels and motor, consult the manual that came with the bandsaw, as wrongful maintenance could invalidate the warranty.
Final Thoughts
Bandsaws are more versatile than you think, and once you own one, you’ll find many uses for them — I know I have!
This guide has taken you through the basics and given you food for thought. If you prefer a more visual tutorial, I highly recommend watching the following video by Paul Sellers:
