I recently fitted a fan in my bathroom ceiling, which discharged through the roof via a plastic pipe.
A few days later, I noticed a constant drip and a puddle of water on the bathroom floor, so I presumed there was a leak. I checked the loft, and the roof looked fine, but I remember noticing how cold it was.
Rechecking the bathroom, I noticed water dripping from the fan. I suddenly realised I had a condensation problem, not a leak!
To resolve this issue, I fitted a condensation trap.
In this DIY guide, I’ll share my experience and show you how to fit a condensation trap in five simple steps.
Why Do You Need a Condensation Trap?
Condensation traps are required on ventilation ducts wherever ducting passes through an unheated space, such as a loft.
Extractor fans in bath or shower rooms, where warm moist air passes through a pipe to the outside, are particularly prone to condensation.
Many modern homes are fitted with Mechanical Ventilation with Heat Recovery (MVHR) systems for ventilation in air-tight houses. These systems also require a condensation trap.
You can form the trap using a U-bend, but it’s only suitable for small horizontal runs.
You need an in-line trap for vertical runs, such as this one from Vortice. This model suits 100mm Ø pipes, so check your pipe size before buying.
Pro Tip: If you connect the condensate pipe to the soil stack, you’ll need to install another trap, known as a running trap, in the pipe run. This second trap will prevent foul odours from entering the condensation trap.
Tools and Materials
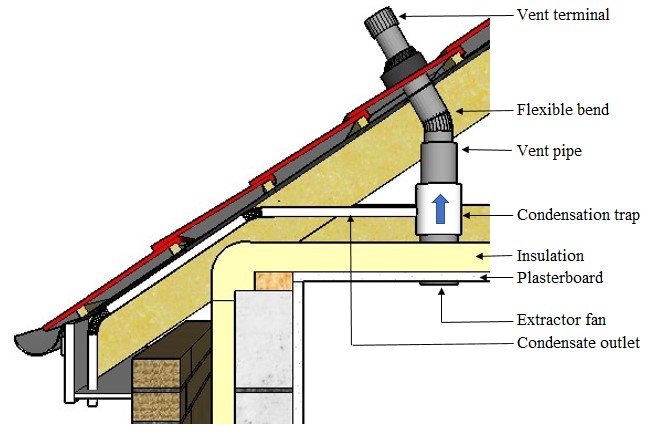
For this exercise, we’ll assume that the fan is in place and the pipework passes through the roof with a vent terminal fitted.
If this isn’t the case, and you’re starting from scratch, you’ll need additional materials from the ones listed below and possibly the help of a roofer and an electrician to wire up the fan.
Tools
- Hacksaw
- Keyhole saw
- Cordless drill with 12mm and 25mm spade bits
- Tape measure
- Extension ladders
- Pencil or marker pen
Materials
- Condensate trap
- 22mm Ø uPVC pipe (length to suit)
- 1m length of 22mm Ø flexible silicone pipe for joints
- 4 x 22mm Ø straight couplers
- Pipe insulation foam
- Foil and bubble wrap lagging for the trap
- PVC adhesive
- Masking tape
Health and Safety Measures
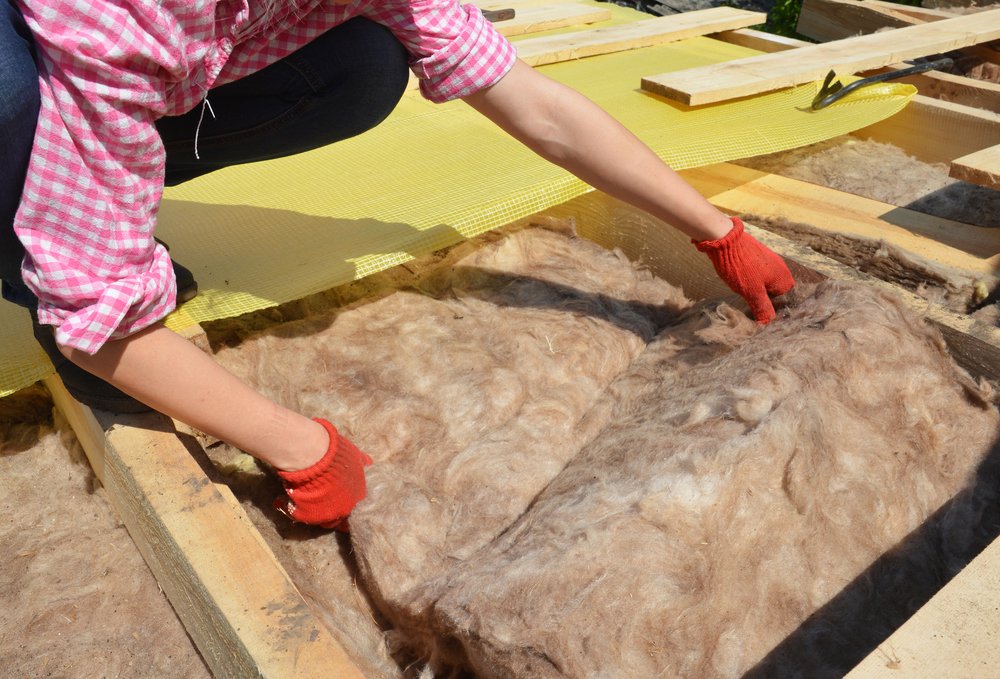
You need gloves and a face mask because you’ll probably be handling mineral wool or glass fibre insulation. Lofts can get very itchy, so ensure you fully cover up.
You’ll need something to kneel on if your loft isn’t boarded. A piece of plywood large enough to span two joists should do the job.
Fitting the condensate pipe into the soffit involves working at height, so ensure your ladders are in good condition and secured at the top.
How To Fit a Condensation Trap — Step-by-Step Instructions
Step 1: Check Out The Roof Space
Don’t start any job without checking what potential problems lie ahead. These are things to look out for:
- Any obstacles between the access hatch and the extract fan — wiring, pipework, water tanks, etc.?
- Do you have insulation on top of the ceiling joists? Many houses now have top-up insulation, which is great for reducing heat loss but can make walking across it hazardous. You may need to install a temporary boardwalk to get to the fan.
- Measure the size of the extract pipework. The condensate trap must be the same diameter.
- Check the headroom — have you got enough space to work?
Pro Tip: Now is a good time to top up your loft insulation if you haven’t already. Doing so could avoid the need to insulate the condensate pipe and trap.
Step 2: Remove a Section of the Pipe
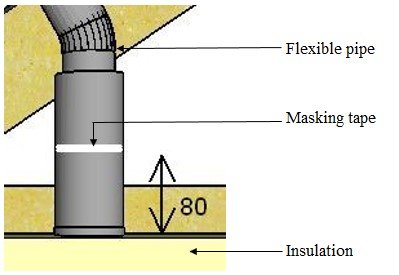
Mark the vent pipe no more than 80mm above the insulation. I like using masking tape to mark this line because it provides a neat line around the pipe. Use your hacksaw to cut the pipe around the marked line.
Note: If there is no flexible pipe, you may have to make two cuts (one above and one below the masking tape). The second cut is required because the trap adds 25mm (see step 3) to the overall length of the pipework.
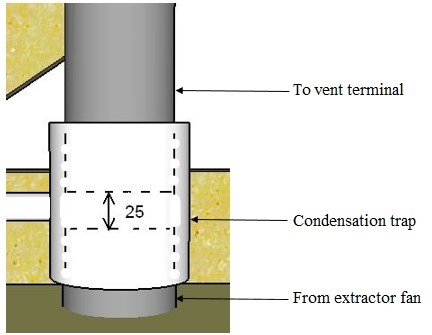
Step 3: Fit the Condensation Trap
If you have a flexible pipe above the vent pipe, it should be easy to lift it, fit the trap onto the pipe from the extractor fan, and then insert the upper vent pipe into the top of the trap.
Note: Some traps have a removable collar top and bottom, so always follow the manufacturer’s instructions on fitting.
If your vent pipe goes straight up through the roof with no flexible connector, follow the steps below:
- Unscrew the extractor fan
- Push the lower vent pipe down
- Fit the trap to the upper vent pipe
- Push the lower vent pipe back up again to fit securely in the trap (you may need help with this)
- Screw the fan back in place.
Doing a dry fit before the final fix is good practice. When doing the final fix, apply glue to the ends of the pipes. The vent pipes will sit approximately 40mm into the trap, leaving a gap of 25mm.
Make sure you fit the trap the right way up — there should be an arrow on the side indicating the direction air will flow.
On completion, you must add lagging to the trap and the vent pipe below to prevent the condensate from freezing.
Step 4: Fit the Condensate Pipe
It’s best to cut and assemble the condensate pipework outside the roof space, where it’s easier to work.
There’ll be some guesswork in estimating the lengths of pipe you need because you can’t reach the edge, so be generous with your estimates. Remember, you can always cut more off when it comes to fitting.
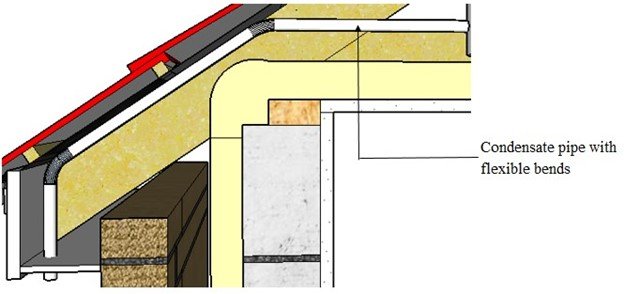
The pipe run consists of three lengths of 22mm uPVC, with two flexible joints and four connectors.
Pro Tip: If the overall length is 1m or less, you can use a single length of silicone pipe.
Once you’ve assembled the condensate pipework, push it into the eaves, and fit the horizontal section to the outlet on the condensation trap.
Remember to keep everything straight, making it easier to fish out the pipe in the next step.
Note: The pipework must be insulated to prevent the condensate from freezing.
Step 5: Bring the Condensate Pipe Through the Soffit
You need to go outside for the final stage, so get your extension ladders out and ensure they’re in good condition.
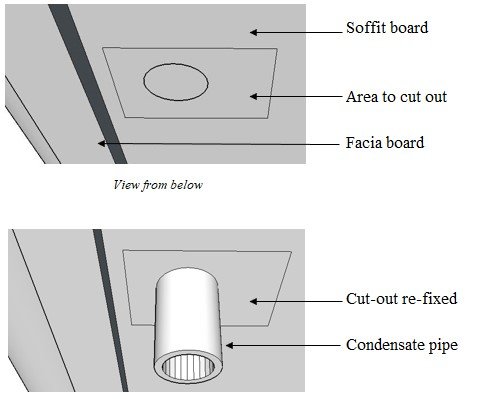
Draw a rectangle on the soffit as close to the facia board as possible — you want the pipe to be away from the brickwork so drips won’t stain it — roughly in the position where the condensate pipe will sit. The size isn’t critical, but you must be able to get your hand through the hole to fish out the pipe.
Drill a 12mm Ø hole in one corner of the rectangle, then, using a keyhole saw, cut along the lines and remove the boarding section.
Back on the ground, drill a 25mm Ø hole in the cut-out section. Climb the ladder again to fit the pipe through the hole and glue the cut-out section back into its original place using masking tape to hold it while the glue sets.
Leave around 50mm of pipe protruding from the soffit and seal around the pipe to keep it in place.
Finish off the job by sanding down any rough edges of boarding and re-painting the cut boarding once the glue has set and you’ve removed the masking tape.
Final Thoughts
Fitting a condensation trap isn’t tricky, but it does require planning, so don’t rush into it without weighing up the situation.
If you want to know how to fit an extractor fan, this video by Charlie DIYte tells you everything you need to know.
As for installing a vent pipe through a roof, this video on the Roofing Megastore will prove extremely useful.
Also, if you have any problems with condensation or mould, several articles in our ‘Infestation, Rot and Damp’ section will help you resolve these serious issues.
FAQ
Below are answers to frequently asked questions about condensation traps.
Where do you put condensation traps?
You typically find condensation traps on pipes and ducts connected to extract or heat recovery ventilation systems.
You must fit a condensation trap at the lowest point in the system to catch any condensate that forms inside the pipe as it enters a cool uninsulated space such as a loft.
How does a condensation trap work?
A condensation trap collects condensate in a bowl at the bottom of the trap. The water overflows into a discharge pipe, which runs outside or to a nearby drainage point.
What is a condensation trap on an extractor fan?
You won’t need a condensate trap if you can discharge air from an extractor fan to the outside through an external wall. However, if the pipe has to pass through an uninsulated space like a loft, you will need a condensation trap.
Electricians typically install extractor fans in bathrooms, shower rooms, and kitchens where the air is moist. As the air is forced upwards into the cooler space, it condenses inside the pipe and drops down to the condensation trap.
How do you stop condensation in extractor fan ducting?
The only way to stop condensation on vertical runs is to insulate the ducting along its length within the uninsulated space. However, the pipework above the roof must also be insulated to be completely effective, which isn’t always easy.
Fitting the extractor fan to an outside wall will not stop condensation, but as the moist air dissipates outside, you avoid internal damage.
If you can’t stop the condensation, you must control it; this is where a condensation trap is extremely helpful.
Are there different types of traps?
Along horizontal pipe runs, you can use a conventional “U” bend or, better still, an in-line trap.
In-line traps are single pipes with a shallow bend that traps condensate as it flows to the outside air. Plumbers commonly use these traps on pipe runs from boilers and air conditioning units.
On vertical pipe runs, usually from extractor fans or Mechanical Ventilation with Heat Recovery (MVHR) systems, you can fit a condensation trap to collect water forming in the pipe. These traps then discharge the water to the outside atmosphere or drainage system.