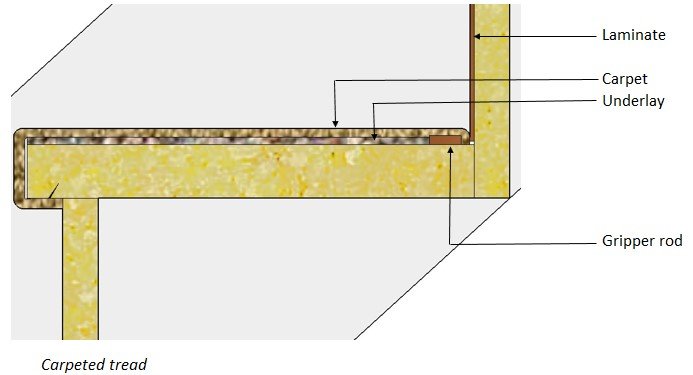
I recently came across an image on Pinterest — always a great source of inspiration for new interior design ideas — showing a staircase with carpeted treads and laminate risers.
This style piqued my interest, so I researched it more deeply, searching for the best methods and materials.
So, if you want to know how to do half carpet and half laminate stairs, this DIY guide is for you.
What Makes a Staircase?
Everyone knows what a staircase is, but not everyone knows the terms used in stair construction or the rules governing the critical dimensions — the going and the rise. All stairs, whether made from timber or concrete, share these standard terms.
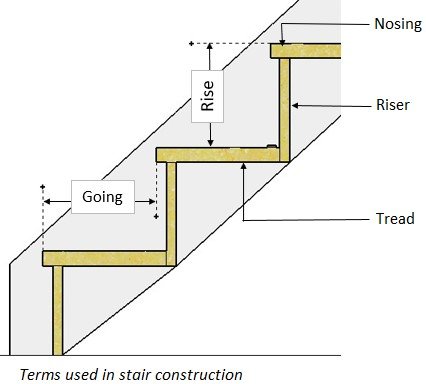
The rise can be anything from 150 to 220mm, and the going 220 to 300mm. Older houses may exceed these dimensions, but this is the current standard.
Laminate Riser
You can use laminate flooring for the riser, but this is difficult to cut, and I prefer a much thinner pre-glued laminate roll that you can cut with a utility knife.
Pro Tip: Don’t use pre-glued laminate rolls for flooring because it isn’t hard-wearing enough, but it’s okay for stair risers.
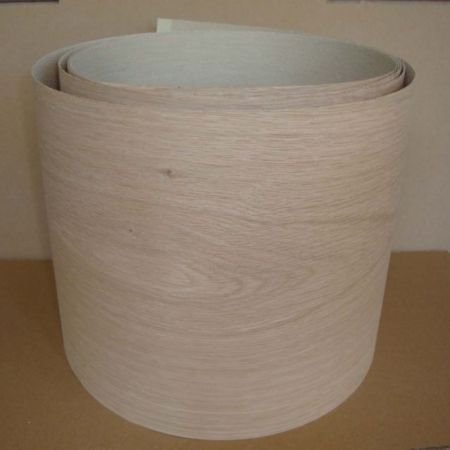
The 200mm wide natural wood veneer iron-on sheets above are ideal for stair risers. The veneer is available in various colours, such as ash, beech, white oak, and mahogany, to name just a few.
Whether you choose a contrasting colour or one that blends in with your carpet (like the one below) is a matter of choice.

The important thing is choosing the right carpet and underlay for your stairs.
Carpet
According to the Collins DIY Manual, hallways and stairs are classed as “heavy domestic, ” meaning the carpet must have a dense pile. You can tell if a pile is dense by folding a piece of the carpet in half. If you can see the backing, it isn’t thick enough.
It doesn’t matter if it’s a tufted or woven pile, although the latter is more hard-wearing. What’s most important is the length of the pile.
On stairs, a long pile can be dangerous as you can’t differentiate between the hard base of the stair nosing and the ends of the pile. Therefore, a short-cut pile is the best option for stairs.
Underlay
Your choice of underlay depends on four primary factors — wearability, acoustics, thermal value, and comfort. Our guide to the best underlay for laminate flooring explains this in more detail, but for stairs, you need something hard-wearing to make the carpet last longer. A dense rubber underlay is ideal, like this one by Underlay Express.
Tools and Materials
We highly recommend acquiring all the tools and materials below for a professional finish.
Tools
- 300mm metal combination square
- Pencil
- Tape measure
- Utility knife with plenty of sharp blades
- Electric iron
- Nail gun or heavy-duty stapler
- Knee kicker
- Hammer
- Cold chisel
Materials
- Laminate roll for the risers
- A sheet of plain paper
- Gripper rod for the treads
- Underlay
- Carpet
Health and Safety Measures
The only potential dangers are the hot iron and sharp blades, so I recommend wearing gloves for this job.
How To Do Half Carpet Half Laminate Stairs
Step 1: Prepare the area
The staircase is one of the busiest routes in the home, so before you start, ensure that everyone has finished running up and down the stairs.
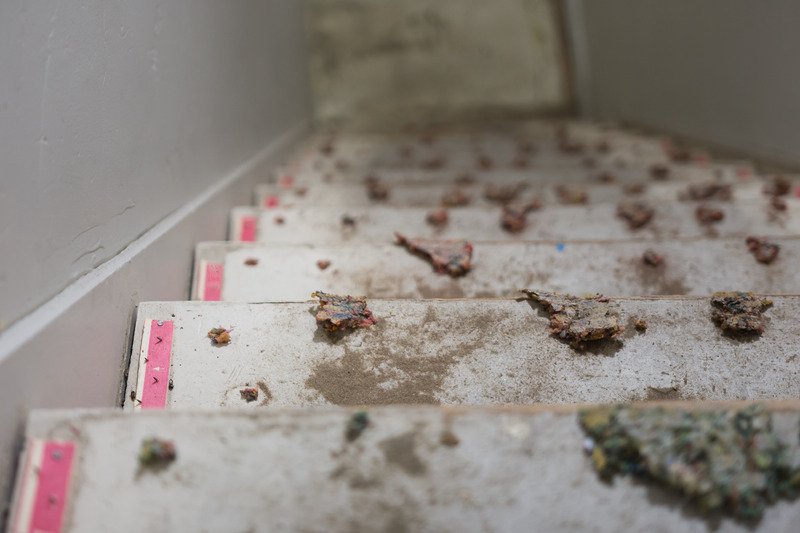
Then, after removing any carpet or other covering, clean down the treads and risers using a hand brush. A car vac is helpful for this purpose too. Remove any old staples or carpet tacks.
You can leave old gripper rods in place if they’re in reasonable condition. Otherwise, remove these too.
Ensure the risers are free from protrusions, such as nail heads or old paint, as these could show through the laminate and cause bubbling.
Step 2: Cut the laminate sheet
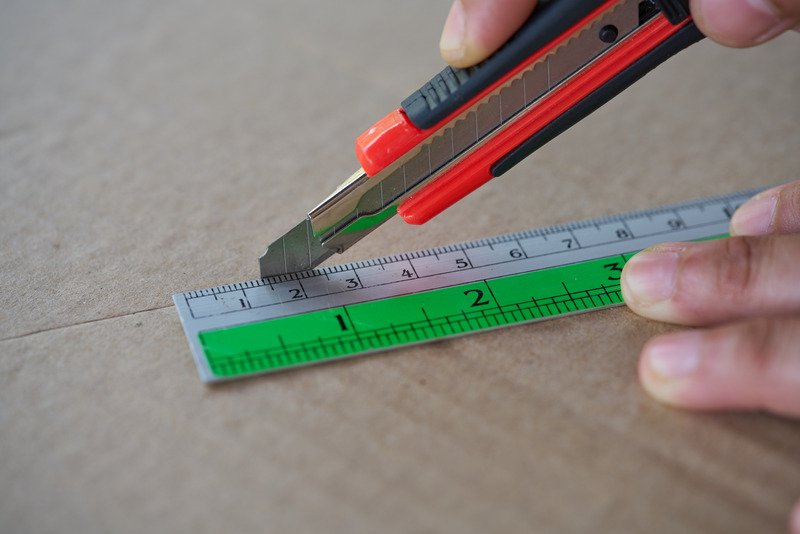
We’ve chosen the iron-on type of laminate rather than the one you glue.
You may find that a 200mm wide roll fits perfectly, but you must trim a bit off in most cases. Use a utility knife to trim it if it’s more than a few millimetres.
- Measure the width of the stairs.
- Lay the laminate flat onto a clean work surface, decorative side up.
- Mark the measurement from Step 1 onto the edge of the laminate.
- Use a combination square and pencil to draw a 90⁰ line from the mark to the other edge.
- Cut along the pencil line using the utility knife and the square as a guide.
- Set the combination square to mark the height of the riser to the underside of the nosing.
- Transfer this measurement to the laminate and mark that point. It’s best to make this around 3–5mm shorter to allow for any discrepancies in the tread.
- Do this at several points along the length and join them by drawing a line.
- Use the straight edge of the square as a guide to cut along the drawn line. Note: You can cut freehand if you’re steady enough — it doesn’t need to be perfectly straight because you won’t see the bottom edge.
- Repeat this process for each riser — don’t assume they’re all the same height.
Step 3: Fix the laminate
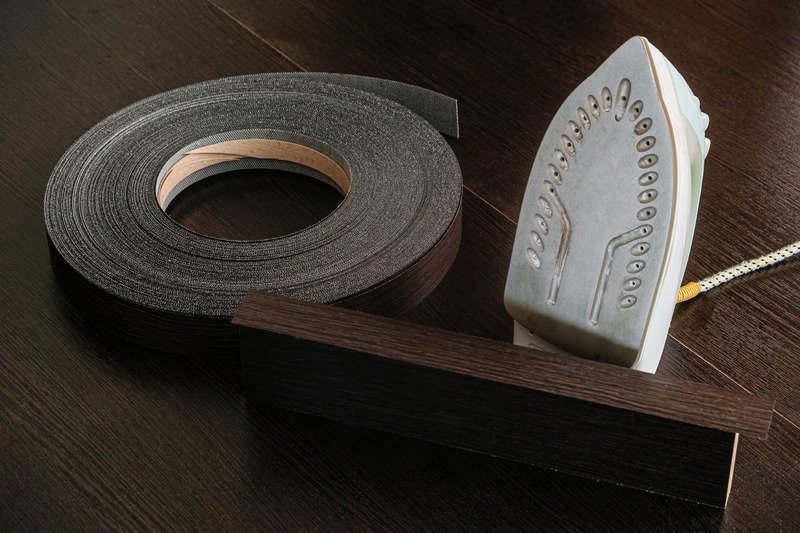
You need dry heat to iron on the laminate, so ensure the iron is empty of water with the steam function turned off. The process is very similar if you’ve ever edged a Formica-faced shelf.
- Preheat the iron using the ‘cotton’ or ‘medium’ setting.
- Position the cut laminate sheet against the riser.
- Place the sheet of paper over the laminate and apply the iron firmly to the riser, starting at the top corner — it doesn’t matter which.
- Draw the iron firmly across the top edge just below the nosing. This motion should hold the piece in place.
- Continue this process over the entire area of the riser, ensuring there are no air bubbles or loose edges.
- Repeat this process for each riser.
Step 4: Fitting the Carpet
For this stage, you’ll need underlay, carpet, and gripper rods all cut to size. It’s best to over-size the underlay and carpet a little because you will trim as you lay and fix them.
We’re going to start at the bottom and work up.
- Nail the gripper rod to the tread, leaving a gap of 6mm from the face of the riser.
- Lay the underlay across the entire tread length, butting up against the gripper rod.
- Trim the underlay to the edge of the nosing using a utility knife.
- Tack or staple the underlay to the tread to stop it from moving under the carpet.
Pro Tip: Don’t forget to change your knife blades regularly. A sharp edge is essential for carpet fitting.
- Take a strip of carpet and position this on the tread.
- Roll the edge under the nosing until it touches the riser below.
- Use the nail gun (alternatively a staple gun with 8mm staples) and tack the carpet to the underside of the nosing. Fix at around 100mm centres.
- Smooth the carpet as you move along, and ensure the edges are square.
- Use the knee kicker to stretch the carpet over the gripper rod.
- Tuck the edge of the carpet behind the gripper rod — it’s ok if a bit is left upstanding.
- Use the hammer and cold chisel to force the carpet into the gap while carefully not damaging the laminate.
- Cut away any surplus carpet at the back and sides.
Repeat all the steps above on each step until you reach the top.
Final Thoughts
Fitting carpeted treads and laminate risers is a great way to give your stairs a new look. It’s also a relatively simple DIY job if you follow the steps above.
To learn more about laying carpet on treads, watch the video below by Keith Shannon.

If you’re considering giving your stairs a complete makeover, check out our staircase refurbishment cost guide.