Property Workshop is proudly reader-supported. When you buy through links on our site, we may earn a small Amazon affiliate commission but this does not affect the price you pay. Learn more here.
After many hours researching and testing the top paint sprayers, we found that the Wagner W100 is the best paint sprayer in the UK for 2024. We like it so much that we used it during our recent decorating project.
We especially like its versatility, click & paint handle and price. However, there are better options if you frequently paint large surfaces, so read on to see which model works best for you and your DIY projects.
Paint Sprayer Reviews — The UK’s Top 3 in 2024
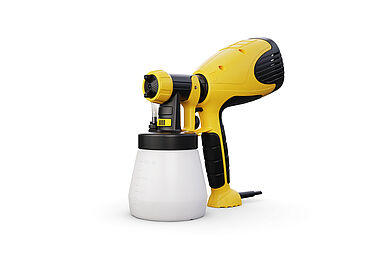
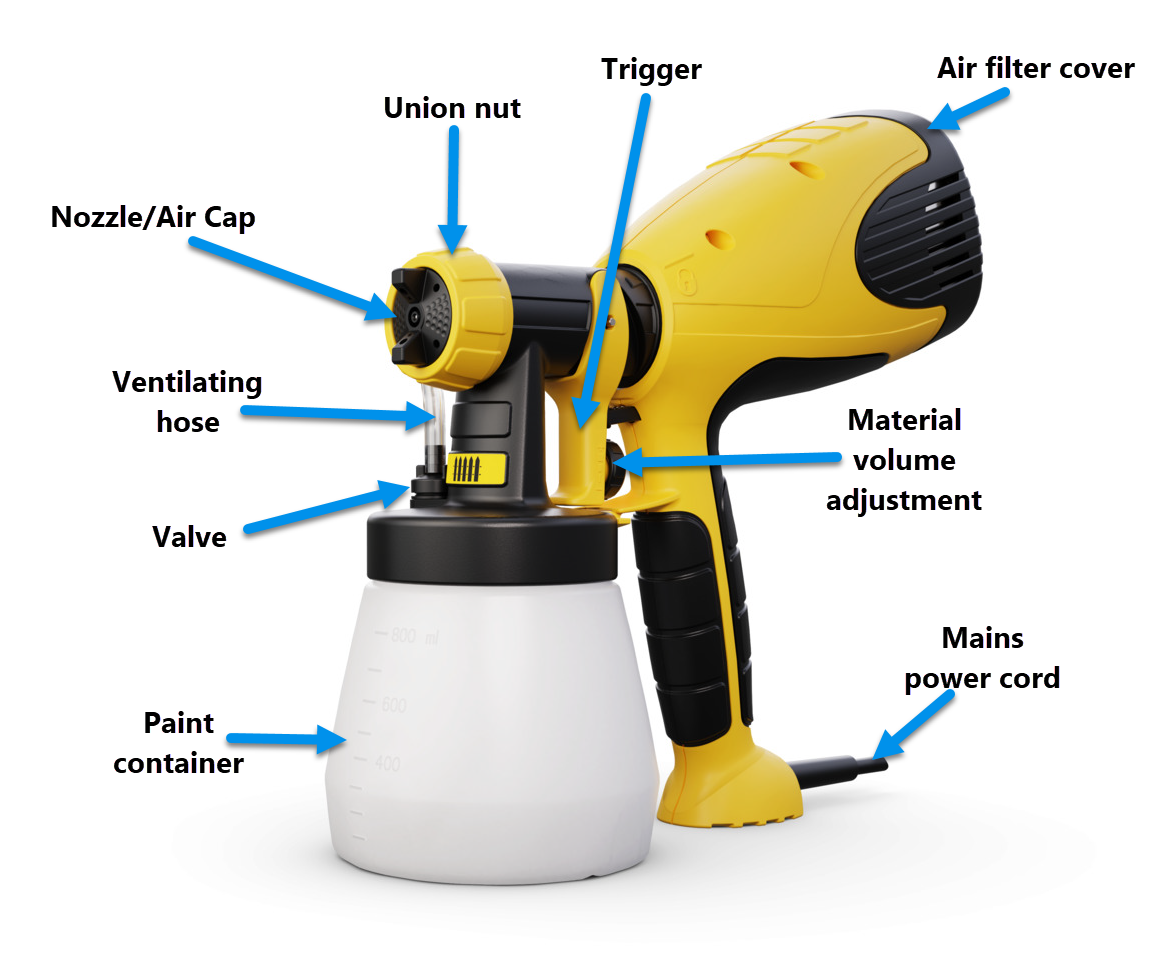
1. Wagner W100
- Works with all low-viscosity solvent-based and water-based materials
- Extra-fine atomisation for uniform coverage
- Separable gun for fast spray attachment changes
- Air jacket encloses spray jet for minimum masking work
- Includes 3-way adjustable paint jet
- Continuous regulation of material volume for precise painting
The Wagner W100 is a great all-around HVLP paint sprayer that works equally well on wood and metal surfaces.
The fully adjustable paint volume, three unique spray patterns, and click & paint handle make the W100 flexible and easy to use.
If you’re new to paint spraying and only plan on doing the odd job occasionally, you can’t go wrong with this inexpensive HVLP paint sprayer.
Pro Tip: Adjust the spray pattern according to the type of painting you’re doing.
| Pros | Cons |
|---|---|
| Click & Paint handle lets you quickly change the paint pot/refill | Low power (280W) |
| Fully adjustable paint volume | Small canister capacity (800ml) |
| Three sprayer patterns — horizontal, vertical and detail | |
| Easy to clean | |
| Compact, lightweight and easy to use | |
| Inexpensive |

2. BLACK+DECKER HVLP200
- Side filling canister for quick refills or emptying
- Precise and easy spray pattern adjustment
- Fast and easy to use for painting projects
- The paint flow Indicator displays the current flow setting
This BLACK + DECKER model suits all painting tasks, especially those involving large surfaces. It works particularly well with stains and comes with a mixing bucket for thinning paint.
The HVLP200 is lightweight and a good option for ceilings or large areas, but it also works well for detailed projects like painting furniture.
This model comes with a paint flow indicator, helping you achieve an even coating each time, and the canister fills via the side, making it easy to load or empty.
Due to its flexibility, ease of use and low price, we recommend it for DIYers doing occasional painting projects. Its lack of power and paint capacity means it’s not a great choice for professionals.
| Pros | Cons |
|---|---|
| Powerful (400W) for the price | Question marks over durability |
| Large canister capacity (1200ml) | Slow paint flow rate |
| Side filling canister makes filling/emptying quick & easy | Paint requires lots of thinning |
| Paint flow indicator | |
| Precise and simple spray pattern adjustment |
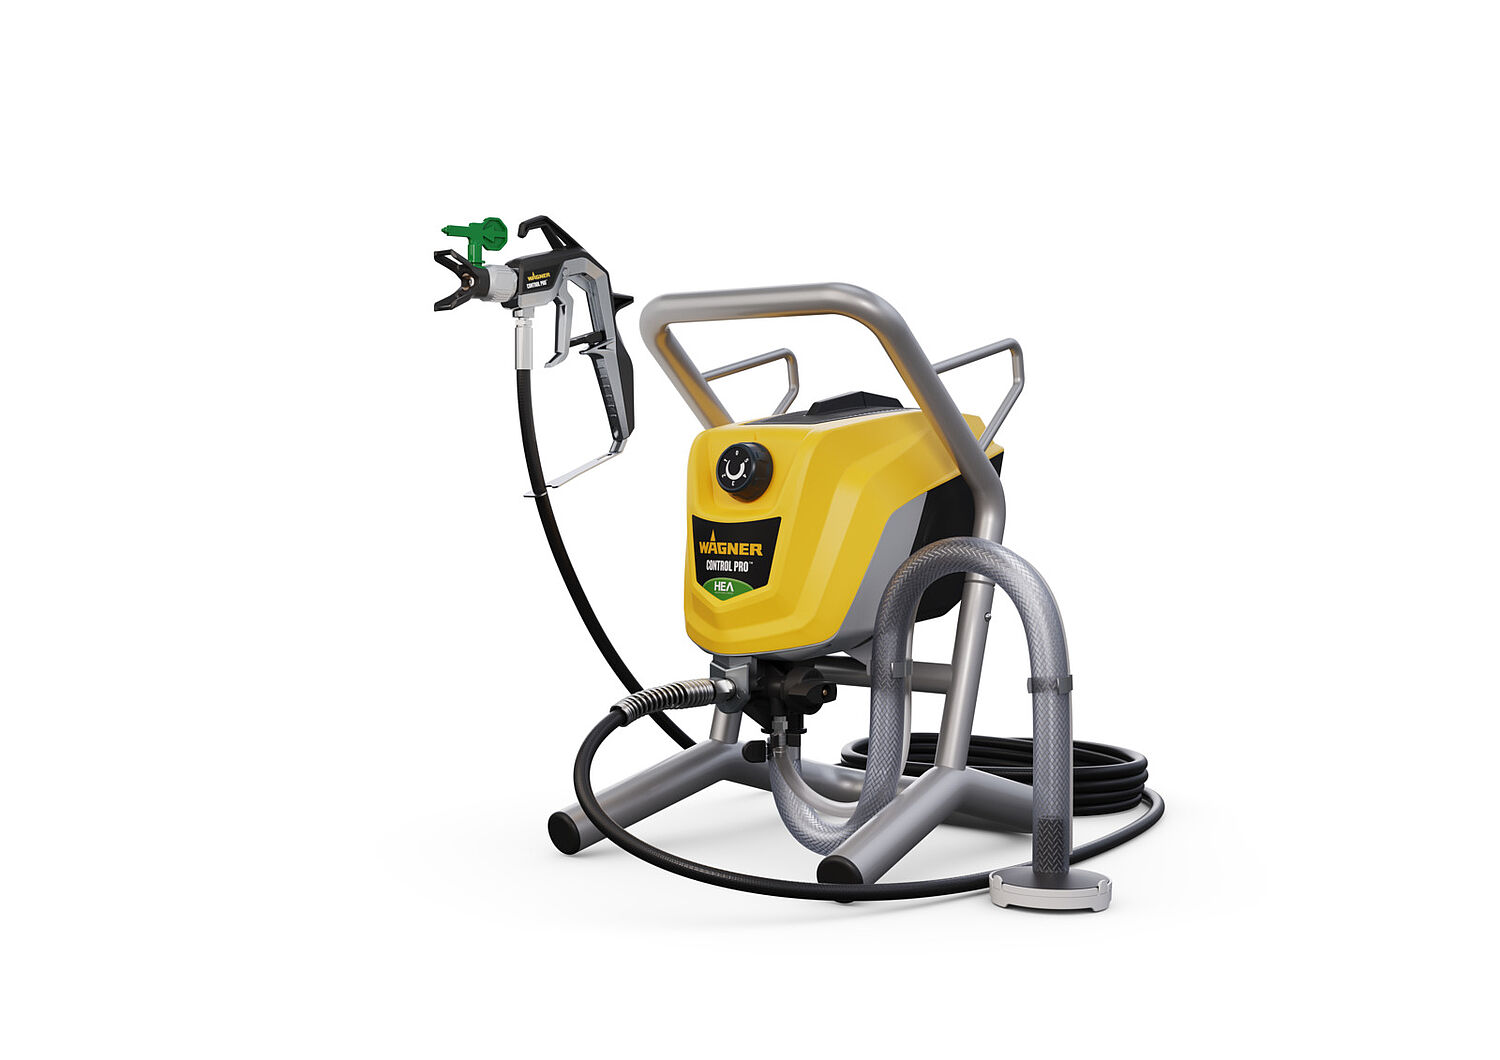
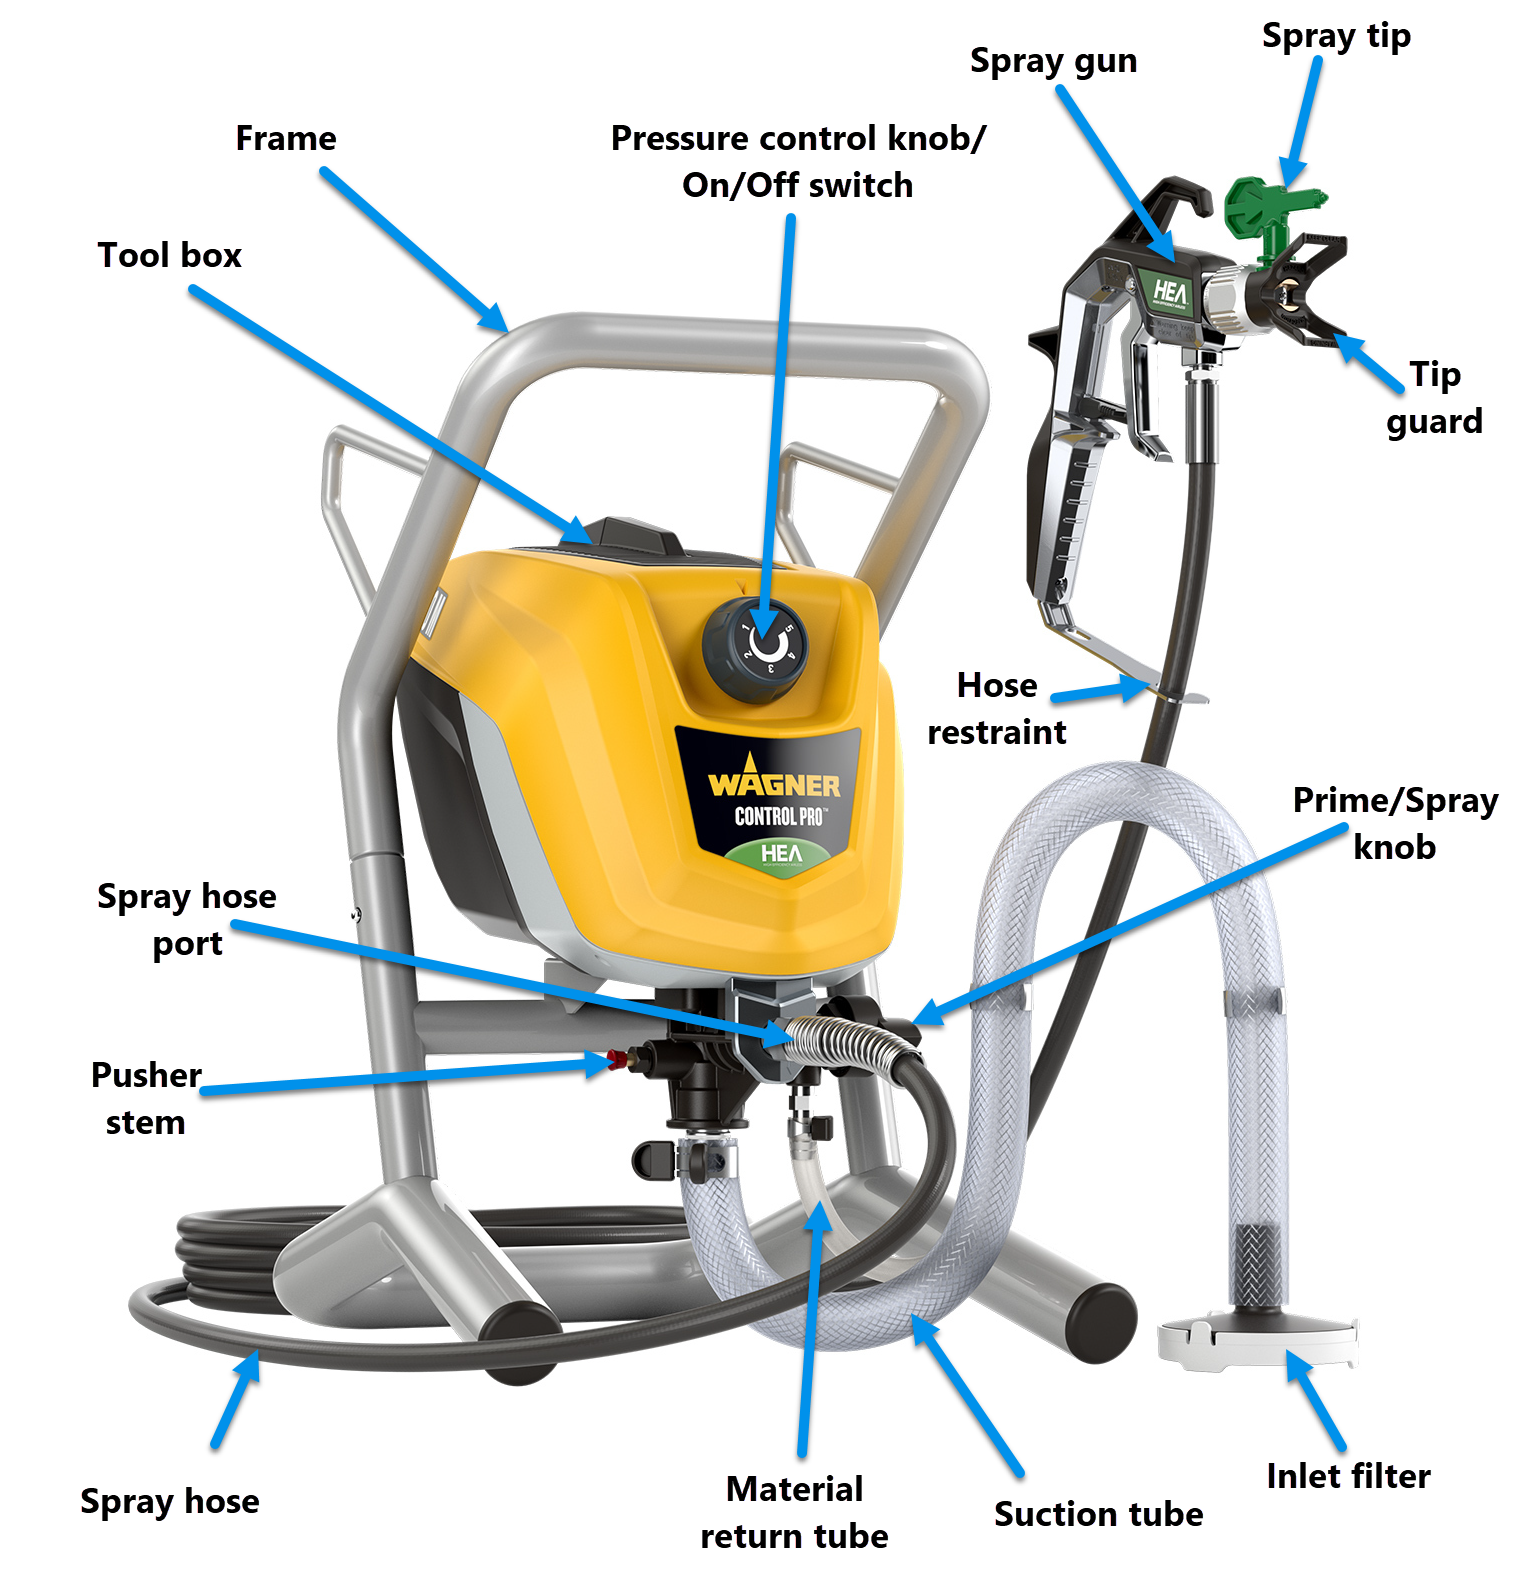
3. Wagner Control Pro 250 M
- Works with water and solvent-based paints
- Also suitable for varnishes, wood preservatives, stains and oils
- High-efficiency airless technology with reduced spraying pressure
- Lightweight airless spray gun with a two-finger trigger
- Innovative nozzle technology
- Direct intake from the paint container
- 15m flexible paint hose
Our first two models are HVLP sprayers, and they’re aimed at DIY enthusiasts. This airless sprayer is aimed at professionals or DIYers who plan on doing lots of painting.
The Wagner 250 M is compatible with all water and solvent-based paints, varnishes and stains. You can even use it for anti-corrosion coatings.
The 250 M is small and lightweight, making it a great choice for serious, heavy-use DIYers or professionals — many pros swear by the performance of the 250 M.
As with all airless sprayers, paint is fed to the sprayer directly from its tin or a separate container via a hose. So unlike HVLPs, you don’t waste time refilling a canister.
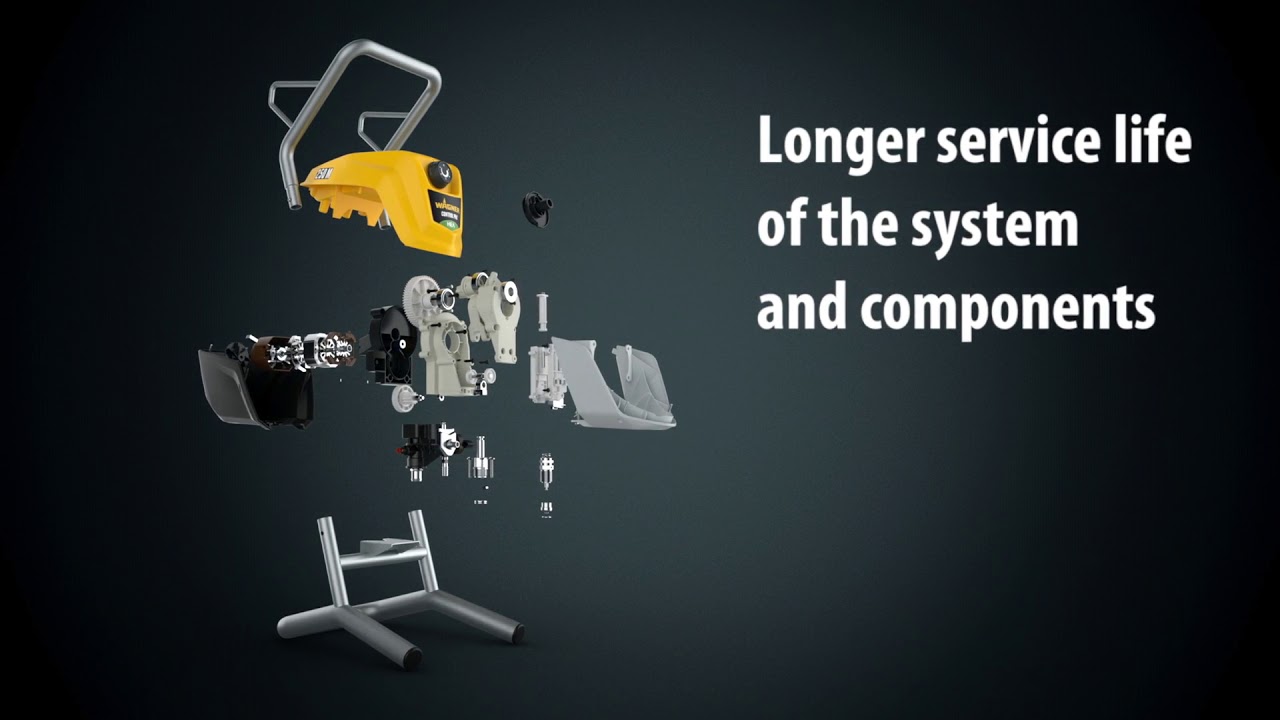
This model features High-Efficiency Airless (HEA) technology, improving control, coverage and accuracy. This means less prep work and wasted paint than other airless models.
The video below provides a nice overview of High-Efficiency Airless (HEA) technology and the benefits of this model.
Pro Tip: The 250 M has a two-finger trigger which means less trigger pressure on your fingers and less recoil.
| Pros | Cons |
|---|---|
| Very Powerful (550W) | Expensive |
| HEA technology greatly improves control, coverage and accuracy | More suitable for pros, not occasional DIY users |
| Pulls paint directly from paint tins | |
| Excellent flow rate (1.25 l/min) | |
| Good spray pressure (110 Bar) | |
| Long hose length (9m) |
Best Paint Sprayer — 2024 Comparison Table
| Model | Type | Power | Flow Rate | Spray Pressure | Canister Capacity | Hose Length | Rating |
|---|---|---|---|---|---|---|---|
| Wagner W100 | HVLP | 280W | 110 ml/min | N/A | 800ml | N/A | 8.5 |
| BLACK+DECKER HVLP200 | HVLP | 400W | Unknown | N/A | 1200ml | N/A | 7 |
| Wagner Control Pro 250 M | Airless | 550W | 1.25 l/min | 110 Bar/11 MPA | N/A | 9m | 8 |
Paint Sprayers Buying Guide
There are two types of paint sprayers, High Volume, Low Pressure (HVLP) and Airless.
HVLP Paint Sprayers
In HVLP sprayers, air pumped from a turbine atomizes paint and pushes it through a narrow nozzle outlet, producing a fine airborne mist. This paint mist hits the surface, creating an even finish. Since more paint adheres during the first coat, less paint is wasted.
You can use HVLPs with solvents, emulsions, wood preservatives and stains, but not lacquers and varnishes. We recommend using HVLPs for interior decorating as they’re excellent at covering trim and moulding.
Turbine power is measured in watts (W). Generally, a more powerful turbine produces better paint coverage, so look for HVLPs with the highest wattage in your price range.
The nozzle at the front of the sprayer determines the spray pattern width. Larger nozzles work better on bigger surfaces such as decking, whereas smaller ones are more suitable for kitchen cabinets and furniture.
All HVLPs must be taken apart for cleaning. This job isn’t difficult, provided you follow the manufacturer’s instructions.
Airless Paint Sprayers
In airless paint sprayers, a piston pressurizes the paint and pushes it through a narrow outlet. The combination of high pressure and a tight squeeze shear the paint into tiny particles.
Airless models spray paint directly from the paint container via a hose attached to the sprayer. This allows airless models to spray large areas without frequently reloading the sprayer’s canister (as you must with HVLP models).
Changing the nozzle allows you to spray various paint viscosities (liquid thickness). Airless models can spray viscosities ranging from thin wood stains and varnish to thick latex paint.
The downside to airless sprayers is they waste more paint than HVLPs. I.e. they spray so much paint at once that 20–40% does not adhere to the intended surface.
Furthermore, when painting outdoors, paint from airless sprayers can go all over the place, including plants, cars or adjacent properties. So warn your neighbours before using an airless paint sprayer, and cover everything you don’t want to paint.
HVLP or Airless?
Only choose an airless paint sprayer if you’re a professional painter or you’re a serious DIYer who frequently paints large areas with thick paint.
For all other projects, especially ones that require fine detail, we recommend HVLPs, as they’re more economical and offer better control in small areas.
Technical Specifications
Below is a list of key features you should consider when buying a paint sprayer.
- Power (Watts)
- Paint volume/Flow rate (litres per minute)
- Air pressure (bar)
- Canister capacity (ml, HVLP only)
- Hose length
- Viscosity range
- Spray patterns
- Easy, intuitive adjustments
- Nozzle sizes
- Paint thinning (if required)
- Quick and easy cleanup
- Warranty
- Price
Final Thoughts
If you’re a regular DIYer looking for an inexpensive all-rounder, we highly recommend the Wagner W100.
However, if you frequently paint large areas with thick paint, it’s well worth paying the extra and getting the Wagner Control Pro 250 M.