Until recently, I had never sharpened a drill bit, as I thought it was a job for experts. Then a friend told me how easy it was, and since then, I haven’t purchased a new drill bit.
I researched how to sharpen a drill bit and found several methods using various tools and gadgets. I tried a few of them, but the most straightforward process I found is the one I will show you in this guide.
So if you want to save yourself some money, read on.
How Does a Drill Bit Work?
There are many drill bit types because each has a specific way of drilling a hole. The most common materials drill bits have to deal with are:
- Wood
- Metal
- Masonry (brick, concrete, stone)
- Ceramics/glass
Manufacturers typically make drill bits out of carbon steel or high-speed steel. Masonry bits are often tungsten carbide tipped, making them tough to sharpen with a standard grinder, but you should still tidy up the cutting edges from time to time.
Before we get into the step-by-step instructions, let’s look at the parts of a drill bit and the various sharpening aids available.
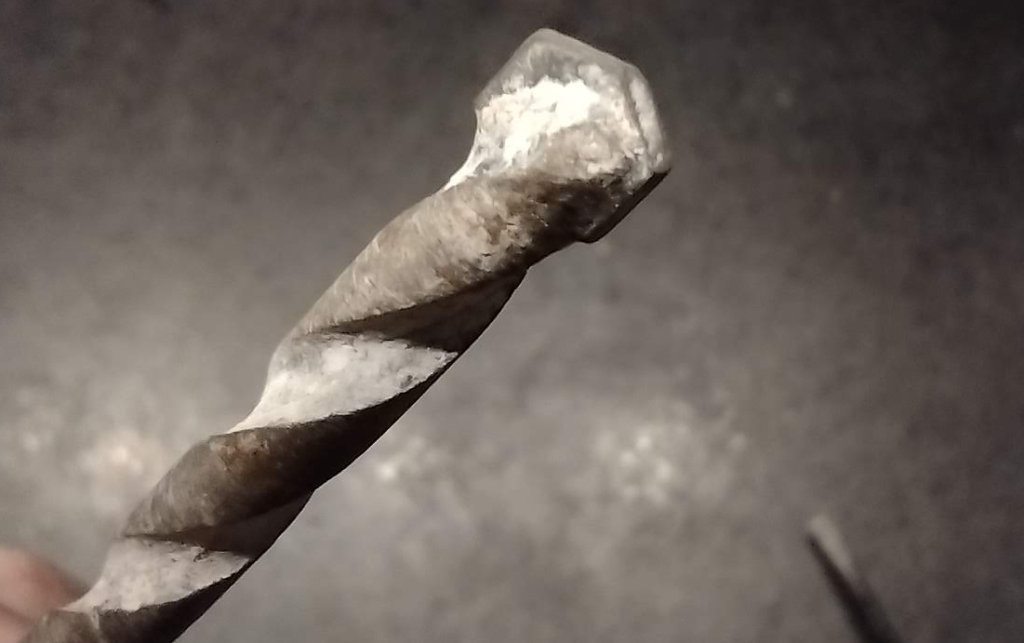
Anatomy of a Drill Bit
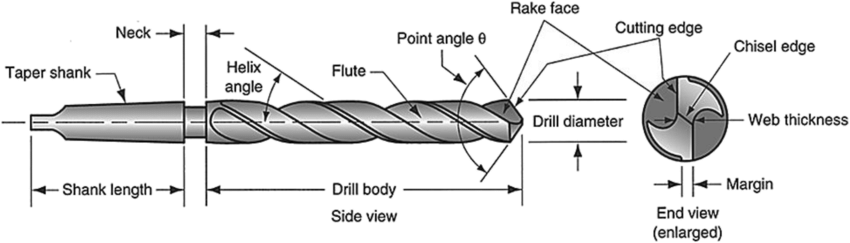
For this guide, the essential things to consider are the point angle and the cutting edge. The illustration above shows a typical drill bit used for drilling into wood or metal, but the same terms also apply to masonry bits.
The Point Angle
If you look at a drill bit tip side-on, you’ll see the surface on each side of the chisel edge slopes. The angle between the surfaces is what we’re looking at here.
Twist drill bits, like the one illustrated above, are machined with a point angle of 118⁰. Masonry bits and heavy-duty metal bits have a much more obtuse angle of 135⁰ because they don’t need to be so sharp.
The Cutting Edge
The cutting edge is the flat surface at the tip of the drill bit that leads into the flute – this is what does the hard work. When sharpening a drill bit, you’ll work from this edge (the rake face) to the curved part leading into the second flute.
Once you’ve sharpened the tip, there should be a well-defined chisel edge at the junction of the two cutting edges.
Sharpening Aids
Many gadgets are available to help you sharpen a drill bit, some better than others. Most of these gadgets work by holding the drill bit at a precise angle (118⁰) to the grinder. Others attach to a power drill and act as a grinding wheel.
There are a few that do both. I.e. hold the drill bit at the correct angle while an internal grinder does the sharpening. One of the best on the market is the Drill Doctor, but at a cost ranging from £110 to £230, you need to sharpen a lot of drill bits to make this worthwhile.
If you have a bench grinder, the Sealey grinding attachment represents good value at less than £30, and you can use it on an extensive range of bit sizes.
However, I don’t regard 118⁰ as essential in creating a sharp drill bit. What is important is that the two sides of the bit head are equal in width and angle.
In the step-by-step instructions below, I show you how to sharpen a drill bit freehand using just your bench grinder. But first, let’s look at the tools and materials you need.
Tools and Materials
Ensure you have all the tools below before you start.
Tools
- Bench grinder
- Angle grinder or multi-tool (for brad point drill bits)
- 150mm x 16mm x 4mm medium grade safe edge file (for spade drill bits)
Materials
- A tin containing cold water.
Health and Safety Measures
Wear goggles and a face mask (optional), but no gloves, as these can get caught in the grinder.
Remember to keep your fingers away from the end of the drill bit.
How To Sharpen a Drill Bit — Step-by-Step Instructions
Follow the steps below to achieve perfectly sharp drill bits.
Step 1: Preparation
Clear the area and ensure you firmly fix the bench grinder. Put away any flammable liquid because there’ll be sparks flying.
Place the tin containing cold water close by to dip the drill bit in as it gets hot quickly.
Step 2: Inspect the Drill Bit
Inspect the spiral grooves (the flute) for any lodged debris. Remove debris using any pointed tool, like a flathead screwdriver.
Check the drill bit’s tip to see if the chisel edge is still well-defined. Also, look at the cutting edges and ensure the slope on each side of the chisel edge is the same. You’ll look to address these possible issues when sharpening the drill bit.
Step 3: Start Grinding
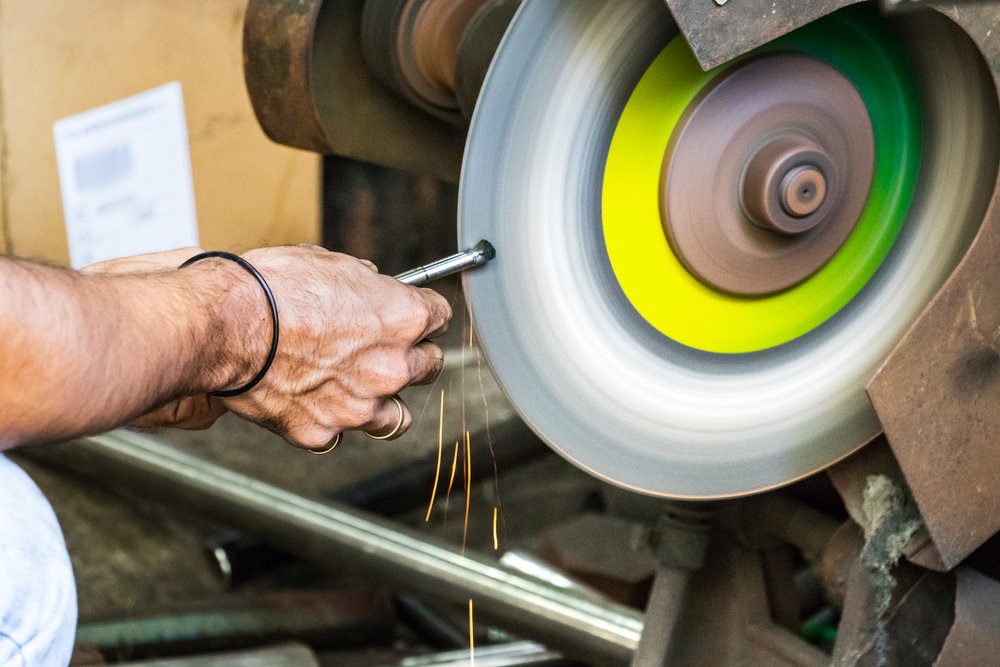
Start up the grinder and offer the drill bit up to it, using the tool rest to support the head. The drill bit should be 60⁰ for a wood/metal bit and 67⁰ for a masonry bit (roughly equal to half the original point angle).
I know that sounds very precise, but basically, keep the sloping tip parallel to the face of the grinding wheel.
Apply slight pressure as you engage with the wheel. The intention is to remove the worn material, not reduce size.
Pro Tip: Don’t let the bit get too hot. Keep checking for any change in colour (red or blue). Overheating will anneal the steel, making it unsuitable for cutting more challenging materials such as metal.
Do this in 5-second bursts and then dip the end of the bit in the water to cool it down. Check the tip of the bit to see how it’s going – a magnifying glass helps with this. Look for any unevenness in the surface and correct this on the next go.
Rotate the drill bit slightly as you grind away to get a curved surface on the tip.
To ensure each side of the cutting edge gets equal treatment, turn the drill bit through 180⁰ after two or three goes and repeat the process the same number of times.
You’ll know you’ve done it correctly when you inspect the drill bit tip. There should be a straight line – a chisel edge – between each side of the sharpened tip. And remember, the objective is to have equal sides to the bit tip.
Step 4: Extra Steps for Masonry Bits
The tip is wider than the shaft on a masonry drill bit, and the cutting edges often get clogged up with brick dust or cement. You can remove this using the grinding wheel, but it might be easier to use a sharp tool, as in step 2, especially on smaller drill bits.
Apply the drill to the grinder as in step 3. You want a flat surface on the tip of a masonry bit, not a curved one, so don’t rotate the bit as you grind.
You now need to dull the chisel edge. This step may sound strange, but masonry bits work differently from wood or metal drill bits. I.e. masonry bits pound their way through brick or concrete with the rotary movement removing material as you drill.
If the chisel edge and cutting edges are too sharp, they’ll break off, so lightly run the tip of the bit over the grinder to remove that sharpness.
Step 5: Auger Drill Bits
An auger bit has a pointed tip that drills a pilot hole for the larger drill body to follow.
This guide looks at two auger bit types, the brad point and the spade. The way we sharpen these two types is different from the method above for reasons that become obvious.
Brad Point Bit

These drill bits provide pinpoint accuracy. The point can be threaded (like a bradawl) or pyramidal (as illustrated above).
The point angle is 180⁰ (flat), but for drilling into hardwood, the cutting edges are slightly upturned on the outer edge or margin to form spurs.
You need a thin cutting disc, like an angle grinder, to sharpen a brad point bit. It doesn’t have to be powerful, a multi-tool grinder does a good job, but it has to be narrow to get to the cutting edge without damaging the point.
To sharpen using a multi-tool, follow the steps below:
Important Note: This task involves close-up work, so you must wear eye protection.
- Insert the grinder attachment into the multi-tool.
- Hold the multi-tool stationary and press the drill bit against the rotating grinder like you would using a bench grinder (step 3 above).
- Work on the side of the point adjacent to the shoulder, but avoid cutting into it.
- Look at the shoulder. A straight cutting edge is acceptable for softwoods, but you should angle the shoulder toward the point to form spurs for drilling hardwoods.
- Turn the drill bit through 180⁰ and repeat the process.
Spade Bit

Spade bits are similar to brad point bits in the way they work but can drill much larger holes in wood, plastic and similar materials.
You can use a bench grinder for sharpening these bits or an angle grinder as above, but I’m using an alternative method for this guide.
To sharpen using a narrow safe edge file, follow the steps below:
- Hold the drill bit in a vice if you have one – this isn’t essential, but it makes it easier to file two-handed rather than single-handed.
- Use a safe edge file to sharpen the back of the point following the bevel. Just 5 or 6 strokes should do it. The smooth edge of the file prevents cutting into the shoulder.
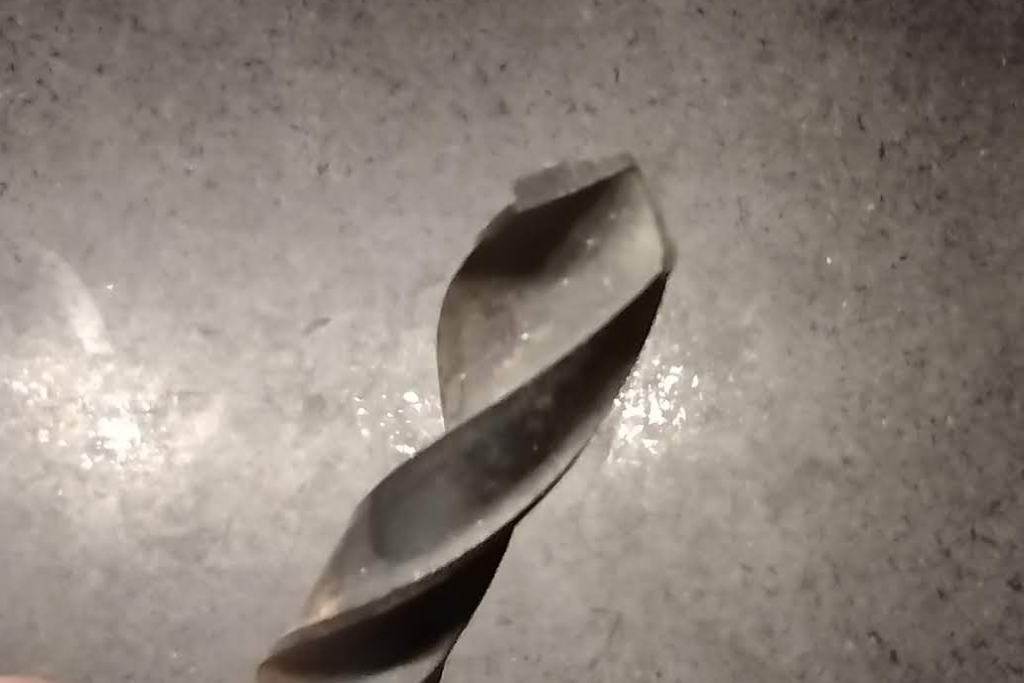
- The image above shows that the cutting edges have been worn flat. In this case, you need to reinstate the 10-15⁰ bevel on the cutting edge and the spurs (the bits that stick up at the ends).
- Use the flat file with the smooth edge against the point and the rough edge to form the spurs. This process requires a little more effort as you must remove some metal to get the desired shape.
- Flip the drill bit over and repeat the process on the other side, starting with the point and then the cutting edge. Apply the same number of strokes on each side to maintain a balanced drill bit
Final Thoughts
There are many methods to sharpen a drill bit, but you don’t need fancy gadgets. Try using the tools you’ve got, or buy tools you can use again for other jobs. I’ve shown a couple of alternatives in this guide, but the ideas are interchangeable.
If you prefer a visual demonstration, the video below by Thomas Fox shows you exactly how to get a perfectly sharp drill bit using the primary method I described above.
