
My first effort at laying laminate flooring wasn’t the best. I chose the wrong type of underlay, and there was too much movement beneath the boarding.
So, for my next attempt, I researched the various types of underlay and learned how the pros lay laminate. I also learned the correct way of cutting around radiator pipes, which I botched the first time around.
In this DIY guide, I share my learnings and provide a step-by-step guide on how to lay laminate flooring like a pro.
Why Choose Laminate Flooring?
Laying laminate flooring is a rewarding renovation project that most DIYers can do with some help from our guides and a little practice.
Pro Tip: Start with a small regular-shaped room before attempting larger rooms and L-shaped hallways.
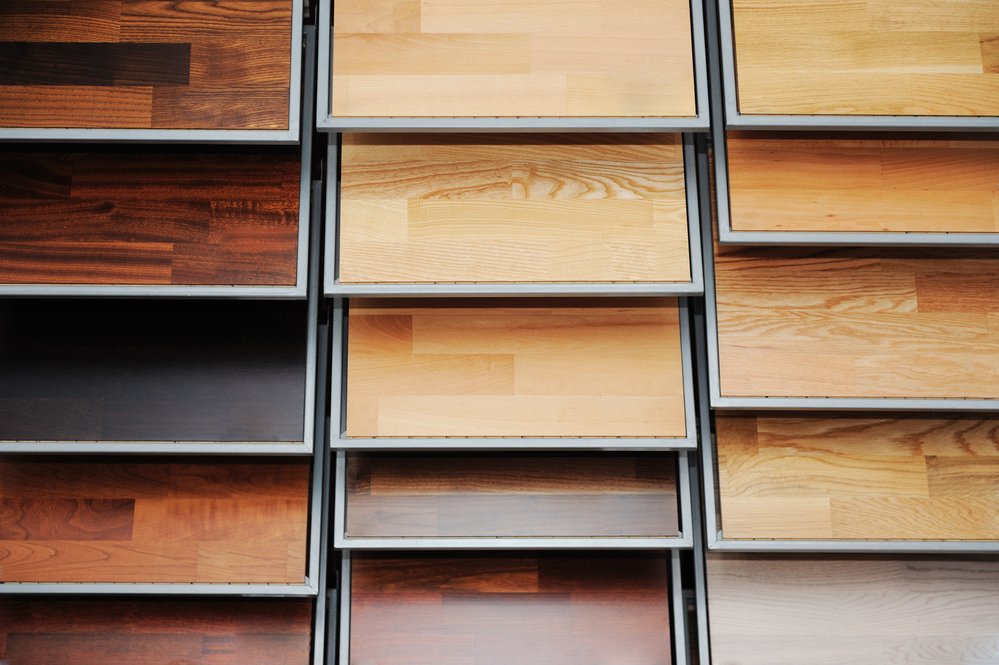
Laminate flooring comprises high-density wood fibre (HDF) with a decorative layer on top and a balancing layer underneath to prevent warping.
The decorative layer can be imprinted with various patterns, but the most popular are wood, tile, and slate effect are the most popular. The boards are finished with a hard-wearing, transparent melamine film.
Thicknesses vary from 6mm to 12mm, but for most domestic situations, go for 8mm. This thickness is robust enough to withstand heavy foot traffic but not so thick that you must adjust door heights, although some trimming might be necessary.
Choosing the Right Materials
The key to laying laminate flooring is choosing suitable materials for the job, which depends mainly on the room.
Heavy-use areas such as hallways need a hard-wearing finish. Kitchens and bathrooms need to be water-resistant. Upper floors need sound-deadening underlay, while solid ground floors may need a damp-proof membrane.
Check the flooring’s slip resistance for bathrooms, usually shown as an abrasion classification (AC). Embossed surfaces typically provide the best slip resistance.
Then there are different interlocking systems to consider. Laminate flooring works best when it acts as a single entity rather than a series of individual planks butted together. Some are tongue and grooved, some click-fit, and others are proprietary systems.
This Carpetright buying guide is an excellent reference point for choosing between various types and styles of laminate flooring.
Tools & Materials
Ensure you have all the tools and materials below before laying laminate flooring.
Tools
- Tape measure
- Pencil
- Adjustable square
- Hammer
- Nail punch
- Combi drill
- 20mm blade bit (for pipes)
- Plane or sander
- Panel saw (fine tooth)
- Jigsaw
- Hacksaw
- Mitre block
- Wood chisel
- Soft mallet (wood or rubber)
- Pull bar
- Utility knife
- Metal straight edge
Materials
- Underlay
- Damp proof membrane
- Waterproof tape for DPM
- Grab adhesive
- Underlay jointing tape
- Laminate flooring
- Spacers
- Foam tape for edges
- Pipe surrounds
- Threshold strip for the doorway
- Edge beading
Health and Safety Measures
Knee pads are essential. You should also use a dust mask, gloves and safety goggles for the cutting parts.
How To Lay Laminate Flooring — Step-by-Step Instructions
If you want to do like a lay laminate like a pro, follow the 5 steps below.
Step 1: Getting Everything Ready
Estimate the Number of Packs Needed
Buy all your laminate flooring from the same source, preferably from the same batch.
Pro Tip: You’ll see a label containing the product’s origin on the boxes. Underneath the bar code, there should be a batch number.
Estimating the required number of packs is straightforward enough — measure the room and calculate the area, then deduct the area of any protrusions, such as a fireplace or columns. If these are minimal, you might choose to leave these in to provide some tolerance.
Usually, the packaging will show the floor area covered by one pack, so simply divide your room area by the coverage. Add about 10% for wastage and round the figure up to a whole number to get the required number of packs.
Choosing the pattern and colour
Choose the colour and the laying pattern — straight or herringbone are common choices.
A herringbone pattern is more expensive than a straight one, but some find it better aesthetically. Tile and slate effect boards are popular in kitchens and bathrooms.
These are the top choices for domestic situations:
| Type of Board | Plank Size | Cost (8mm thick)* | Coverage per pack |
|---|---|---|---|
| Herringbone wood effect | 293 x 1174 | £39/m2 | 2.07m2 |
| Straight wood effect | 192 x 1285 159 x 1383 | £12/m2 £15/m2 | 2.22m2 2.19m2 |
| Tile or slate | 327 x 635 | £15/m2 | 2.28m2 |
Acclimatise the Boards
Packs of boarding are stored in warehouses that are sometimes partially open to the elements, so the air temperature and moisture content differ entirely from your home.
If you lay the boarding straight away, it’s likely to twist and warp as it adjusts to its new environment. Therefore, place unopened packs in the room where you will fit them for 2-3 days to acclimatise to average room temperature.
Do the same with beading or new skirting boards if you intend to use these.
Step 2: Prepare Room
First, refer to our guide on how to finish laminate flooring edges. This guide provides tips for removing or leaving the skirtings in place.
- Remove all doors.
- Measure your new flooring’s height using a piece of underlay and a laminate plank. Trim the bottom of the door frame and architrave using this measurement to allow your new flooring to fit underneath. Use a hammer, chisel, and panel saw for this trimming job. You may also need to trim the bottom of the door (see ‘Step 5: Finishing Off’ below).
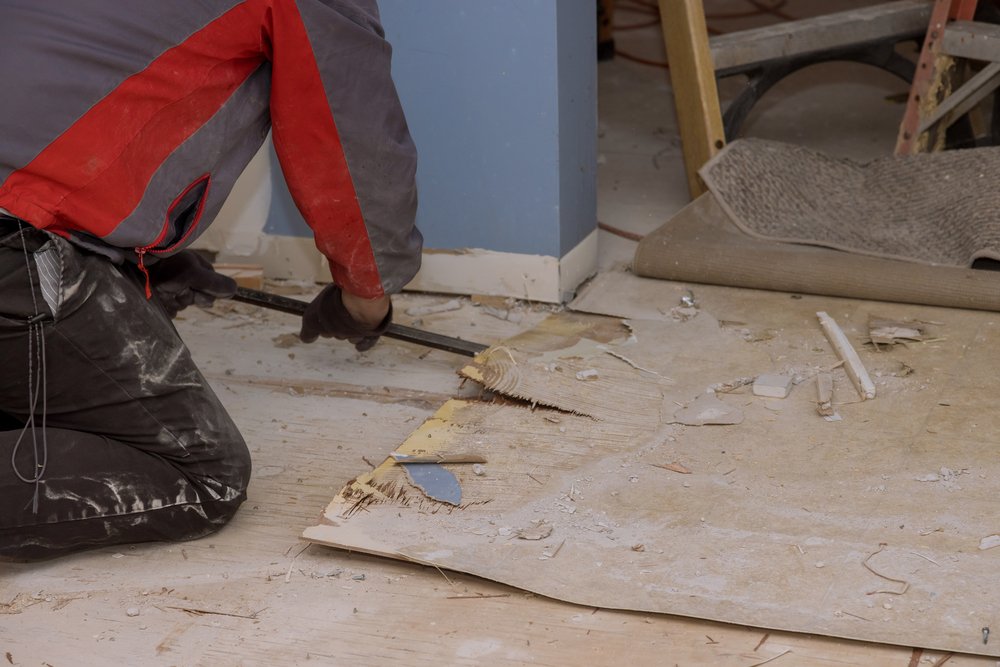
- Remove the existing floor covering, including underlay and any carpet gripper.
- Remove any protruding nails and fix any loose boards if the existing floor has wooden floorboards.
- If the floor is concrete or screed, check it’s dry and level. Underlay can accommodate minor undulations, but you might need a 2-5mm latex levelling screed for more irregular surfaces. Note: This screed takes around 24 hours to dry.
Do you need a DPM?
Concrete floors are usually laid on a thick polythene sheet to prevent damp from rising into the slab. However, this may be missing in some cases or may have been damaged when pouring the concrete.
It’s essential to check the moisture content of floors before laying any type of flooring, and you can do this in two ways:
- A moisture meter tells you whether the surface is moist but won’t penetrate more than a few millimetres deep.
- A hygrometer measures relative humidity, a more accurate test as it measures moisture deep inside the concrete.
There’s a third method, a calcium carbide test, but this involves taking a core sample of the concrete and sending it off to a test centre — a bit OTT for a domestic floor.
For laminate flooring, you must prevent any moisture in the concrete from rising into the boards. If moisture is present, you must lay a damp-proof membrane (DPM). Note: Manufacturers typically incorporate a DPM into their underlay, so check this when shopping for underlay.
Finally, vacuum and sweep the floor to remove dirt and loose bits. Ensure the floor is clean and dry before progressing to the next step.
Step 3: Lay Underlay
Choosing underlay
Factors affecting your choice include:
- Thermal properties: Measured as a TOG rating on the packaging. The higher the TOG, the better the insulation.
- Sound insulation: Measured in decibel (dB) reduction.
- Moisture control: This is a significant consideration for solid concrete floors (see previous section).
- Ability to hide imperfections. I.e. how well does the underlay accommodate imperfections in the subfloor?
- Cost: Ensure you compare like for like and work out the cost per square metre, not the cost per roll or pack.
On the upper floors, you must consider noise reduction, whereas on the ground floor, it’s more about heat loss and dampness. You’ll find more information in our guide to the best thermal underlay for laminate flooring.
Another consideration is whether you have underfloor heating. If you have it, choose an underlay with a low TOG rating, as this allows more heat to pass upwards.
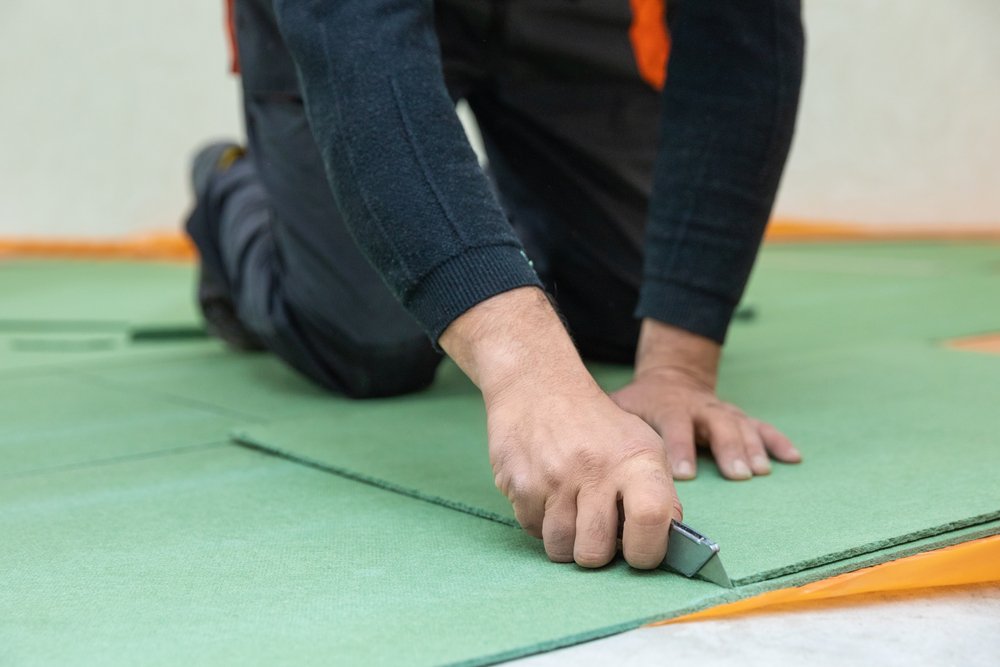
Laying Underlay
It’s important to lay underlay in the opposite direction to the laminate to ensure the joints don’t coincide.
You don’t need any adhesive to stick the underlay down, but you may have to tape the joints if dampness is an issue. Some underlays, such as Royale Sonic Gold, overlap at the edges to effectively seal against moisture.
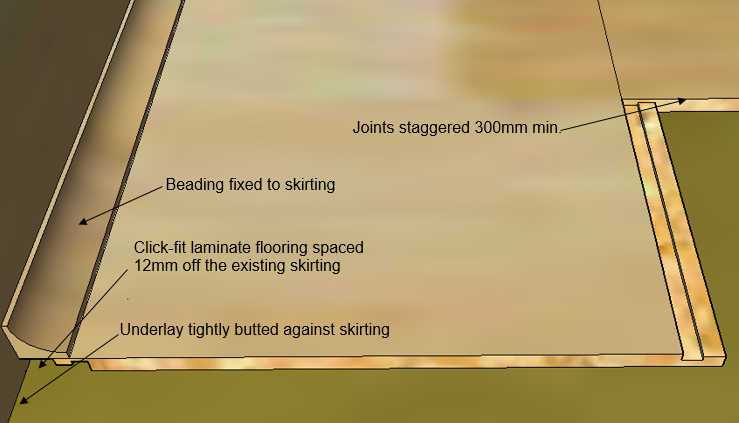
Butt the underlay tight against the wall or skirting. You don’t want gaps around the floor’s perimeter where heat or noise can pass.
Step 4: Lay Laminate Flooring
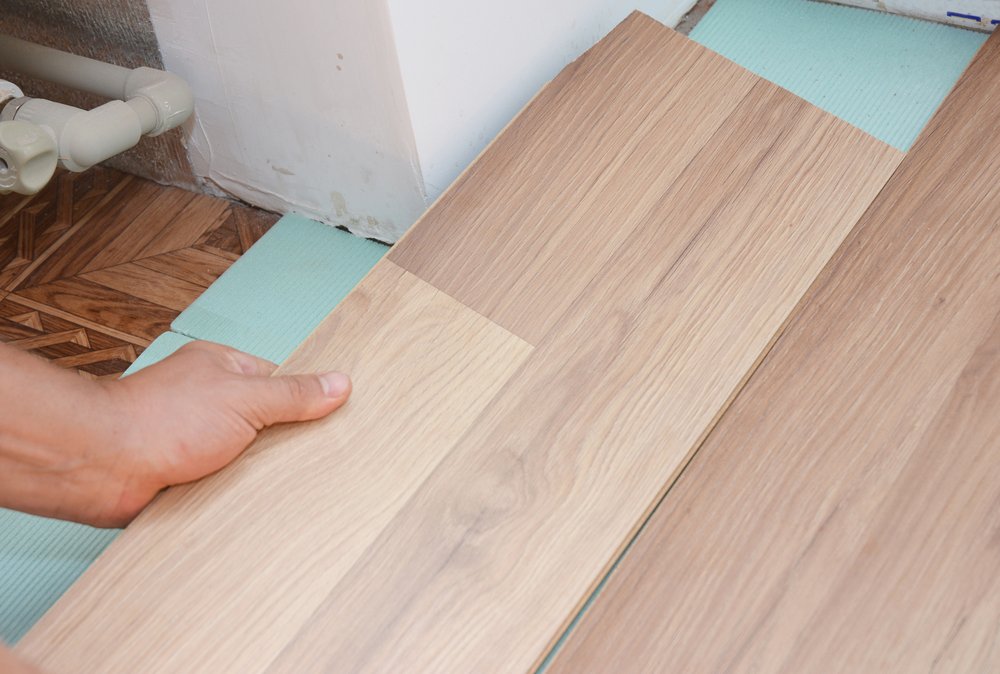
Start at the furthest point away from the door. Some say to start next to the doorway, but I work as if painting a floor or laying tiles.
If you’re using a tongue and grooved board, lay it with the tongue facing the wall, leaving a 12mm gap – use the spacers (the blue objects in Fig. 4) to maintain an even gap all around. With a click system, the downward lip should face the wall.
- Lay the first row of boards loose to see how much of a gap you have at the end – anything less than 60mm is too narrow, so you’ll have to adjust this by reducing the length of the first board.
- If you use a jigsaw for cutting the boards, ensure you use a blade suitable for cutting laminate.
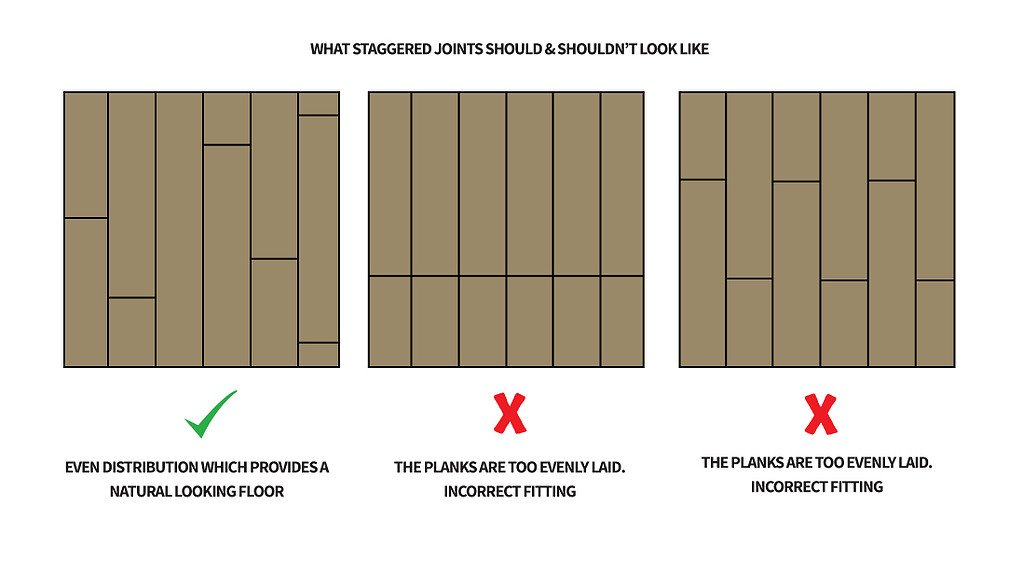
- Offset adjoining rows so the joints are staggered by at least 300mm (see Fig. 2 below)
- Save any offcuts for filling in or starting the next row.
- Close the joints using a tapping block and mallet. Use the pull bar if you can’t use the tapping block at the ends.
Cutting around pipes
- Mark out the position of the pipe on the board.
- Cut a hole using a 20mm diameter blade bit.
- Use a jigsaw or hacksaw to cut out the board’s straight section. Keep this for later.
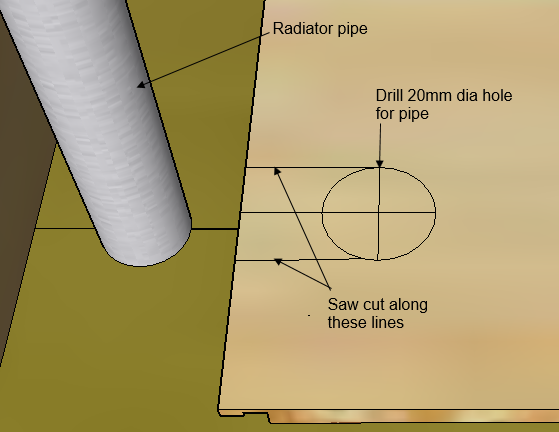
- Push the board towards the wall so the pipe protrudes through the hole.
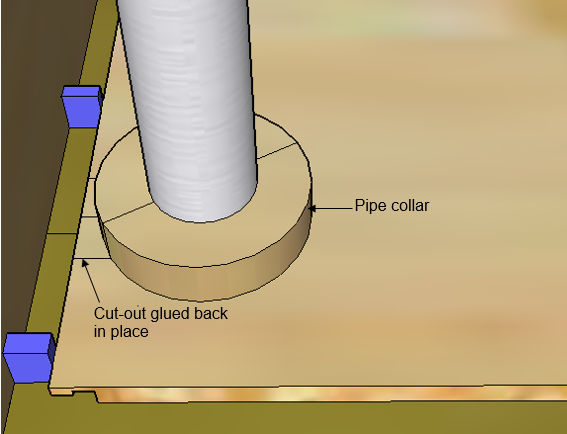
- Apply glue to the straight piece you cut out earlier and fix this back into place.
- Use a pipe collar matching the laminate to surround the pipe.
Pro Tip: Laminate boards are not suitable for stair treads. However, you can use laminate boards on the risers and carpet on the treads — an effective way of visually linking the two levels.
Step 5: Finishing Off
- Refit the door. The door may need trimming along the bottom to open and close smoothly without scuffing the new flooring. I recommend fitting a threshold piece if you don’t intend to run the laminate into the next room or hallway.
- If you removed the skirtings, refit these or fix new skirtings. You may find our guide on how to cut skirtings without a mitre saw helpful for this job.
- Remove the spacers and trim down any protruding DPM/underlay if you’ve left the skirtings in place.
- Fit the edge beading if you didn’t remove the skirtings.
- Use a dry mop and a mild detergent to clean the flooring but avoid getting it too wet.
Final Thoughts
So now you know how to lay laminate flooring, but if you’re still unsure, the video below shows you what to do in easy-to-follow steps.
If you prefer to call in a professional, check out our guide on laminate floor fitting costs.