I remember the 1970s energy crisis, the spiralling costs, blackouts, and petrol shortages.
Today, a whole new generation is trying to save energy. The challenges are different from those of the 70s, but the goal is the same — reduce our energy costs and carbon footprint.
As the Insulate Britain campaign has made painfully clear, one way to achieve this is by insulating our homes. So, in this guide, I will show you how to insulate your house and save on energy bills.
Note: This is a comprehensive guide to home insulation from the bottom up, so only some parts will apply to your situation.
Cut Energy Bills and Save the Planet
Let’s start by looking at the familiar sources of heat loss.
Where Heat Loss Occurs
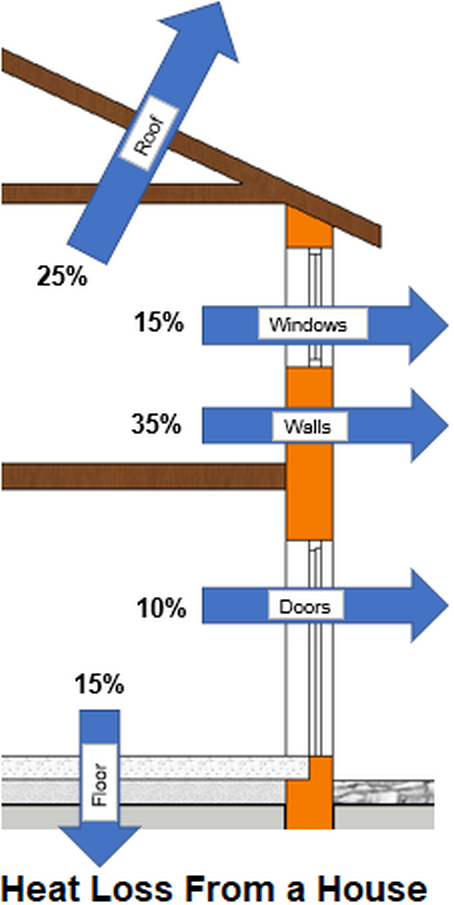
The diagram below shows the areas where most heat escapes in a typical uninsulated house.
Insulation materials
There is a vast range of insulation materials on the market. Here are the main types:
- Quilts
- Glass fibre
- Mineral wool
- Spray foam
- Rigid foam board
- Polyurethane (PU)
- Polyethylene (PE)
- Polyisocyanurate (PI)
- Expanded polystyrene (EPS)
- Extruded polystyrene (XPS)
- Cellulose Loose fill
- Reflective foil
- “Green” products
- Recycled materials — products with a former life
- Compostable materials — products that will rot down
I’m not going to discuss all of these, you’ll be pleased to know, but it’s essential to understand the different forms of insulation available today. You will find a list of products and their potential uses at the bottom of this guide.
R-values and U-values
The R-value of a material is its thermal resistance, i.e., its resistance to heat passing through it.
You may have heard the term ‘U-value’, which is calculated by adding together the R-value of each component. This formula applies to all elements of a house structure — walls, roofs, floors, windows, etc.
For example, a brick wall made up of two leaves of brick, a plastered inner leaf, and a 50mm cavity has a typical U-value of 1.5 (we won’t bother about the units at this stage, but the smaller the figure, the better). This U-value is calculated from the R-value of the bricks, plaster, and air space (even air has thermal resistance!).
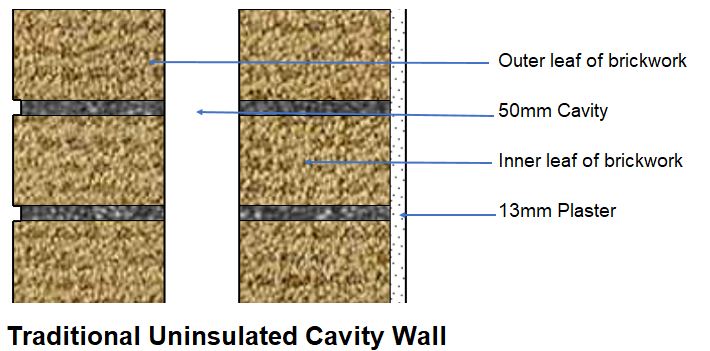
Inserting insulation into the cavity may reduce the U-value to below 0.2 (0.3 is the requirement under Building Regulations). Read my cavity wall insulation cost guide to learn more about this.
Note: R-values depend on thickness, so as the thickness of the material increases, the U-value reduces.
Living in a Conservation Area
If you have a listed building or live in a conservation area, you’ll be limited by the style of doors and windows you can choose. You’ll also be limited by the materials you can use, but there’s always something you can do to insulate your house and reduce energy costs.
Check out the rules in your local area and speak to the planning authority before starting any work.
Costs and Savings for Typical Insulation Measures
The table below compares the cost of insulating a typical semi-detached house against the annual energy savings. This table gives you some idea of payback periods.
| Material | Cost (£) | Saving/year (£) |
|---|---|---|
| Loft insulation | 300 | 240 |
| Loft insulation top-up | 250 | 15 |
| Wall insulation — cavity | 475 | 160 |
| Wall insulation — outside | 5,000 to 18,000 | 260 |
| Wall insulation — inside | 3,000 to 14,000 | 260 |
| Solid floor insulation | 950 to 2,200 | 40 to 55 |
| Suspended floor insulation | 300 to 750 | 40 to 55 |
Tools and Materials
The tools you’ll need depend on what you’re insulating and the materials you’ll be using, but here’s an essential list for most tasks.
Tools
- Box knife
- Keyhole saw
- Hammer
- Combi drill
- Ladders
Materials
- Masonry and wood nails
- Assorted screws and washers
- Insulation materials (see options above)
- Timber battens
- Adhesive
Health and Safety Measures
Many insulation materials irritate the skin and eyes, so always wear gloves and eye protection when handling these materials.
Furthermore, breathing in tiny fibres and fumes harms the lungs, so I recommend wearing a P3R face mask too.
How To Insulate Your House — Step-by-Step Instructions
There are many options for insulating your house, so it’s impossible to include everything in this guide. I’ve provided the most cost-effective methods in the four steps below.
Step 1: Floor
With 15% of the total heat loss from your home passing through the floor, adding insulation in this area offers significant energy savings.
However, most heat loss is around the perimeter if you have a solid concrete ground floor. So for a large floor area, only a tiny amount will transfer heat to the outside. In this case, a thick pile carpet with a good quality underlay is all you need.
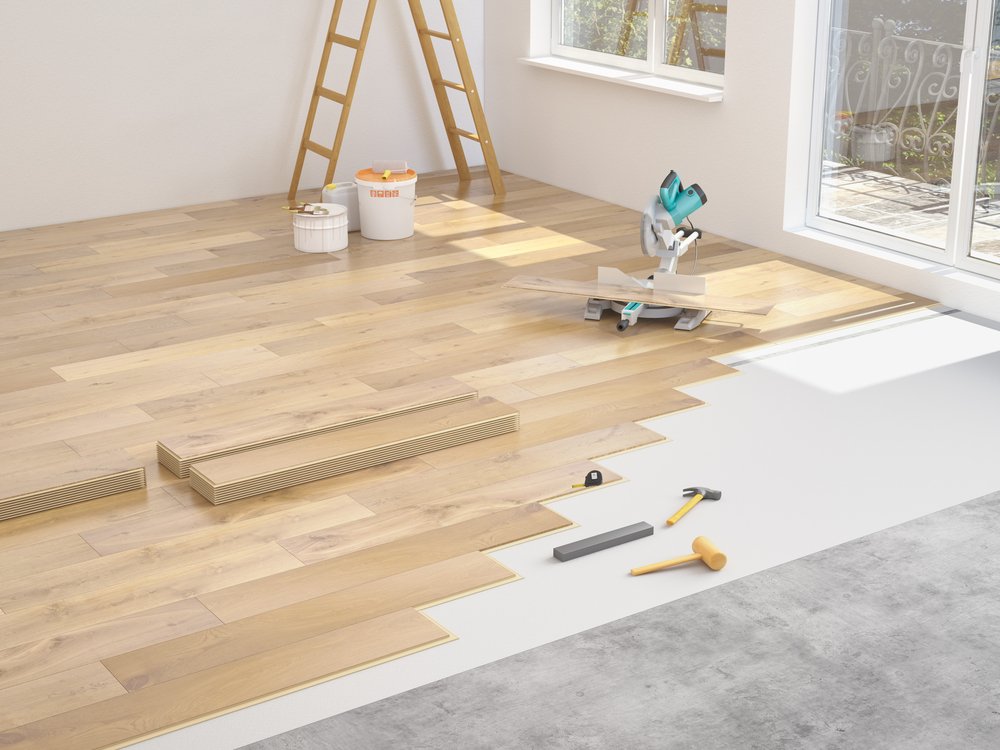
If you’re considering installing laminate flooring, choosing suitable underlay is essential. For thermal insulation, we recommend expanded polystyrene (EPS).
For suspended timber floors, add insulation between the joists. A rigid board is best because it can be firmly wedged in and then held in place with timber battens.
Note: As suspended floors need ventilation underneath, sealing around the edges is vital to prevent draughts.
Step 2: Walls
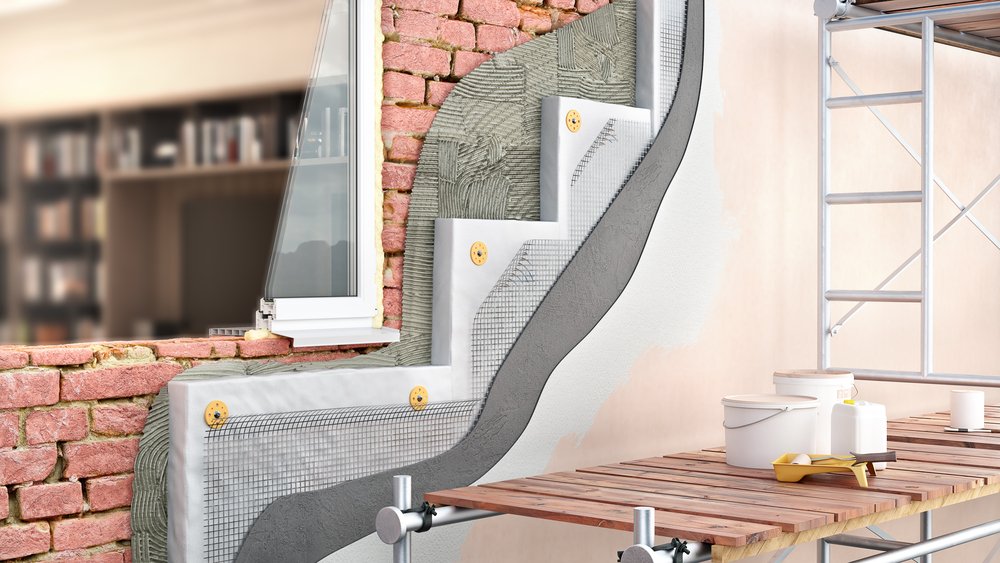
Most heat loss in your home is through the walls (around 35%), so it makes sense to focus on this area when looking at ways to save money.
Often it’s necessary to treat dampness in a wall before doing any insulation work. Adding insulation will reduce the chances of damp reoccurring, but you must remove any existing mould or fungal spores.
There are 3 ways to insulate a wall: externally, internally, and inside the cavity (if there is one).
External Insulation
This method is favoured by housing associations managing old council house stock, as external insulation becomes cost-effective if they can insulate multiple homes at once — usually a complete estate.
External wall insulation involves fixing insulation to the wall and applying a render or cladding system over it. Typically, a 100mm layer of rigid foam or 110mm mineral wool batts will bring the U-value of a solid brick wall down to around 0.3.
This method radically changes the appearance of your home, so you will need to check with your local authority to see if you need planning consent.
External insulation is not a DIY job, but you can find experienced installers in your area through the National Insulation Association (NIA) or the Insulated Render and Cladding Association (INCA).
Internal Insulation
Battening a wall and adding insulation before plasterboarding is a good way of reducing the U-value, and it’s a relatively simple project. It will, however, be necessary to call in a professional to move or adjust any electrical fittings.
Cavity Insulation
This option is another one for the pros. Insulation is blown or injected into the wall cavity, and the entry holes are sealed with cement that is coloured to match the brick.
The table below shows the most common materials for cavity wall insulation and their respective R-values. I’ve provided costs for comparison only.
| Insulation | R-value per 25mm | Cost |
|---|---|---|
| Blown mineral fibre | 3.8 | £ |
| Polystyrene beads | 5 | ££ |
| Polyurethane foam | 6.8 | £££ |
You can learn more about these materials in our guide to cavity wall insulation.
Pro Tip: If the cavity is already filled, but the insulation is failing, read our guide to removing cavity wall insulation.
Step 3: Doors and Windows
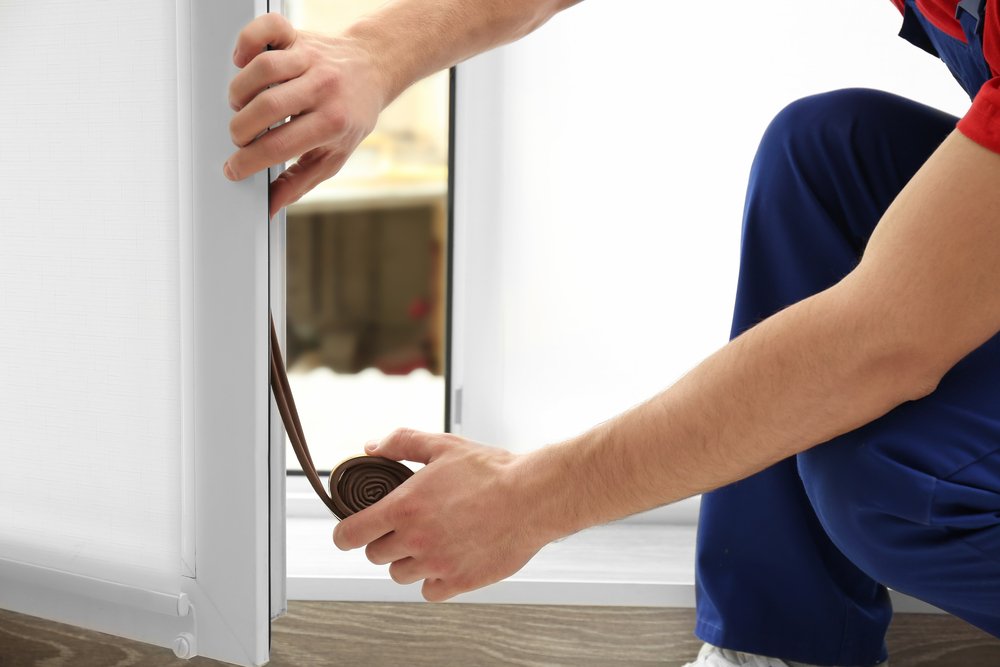
Energy-efficient glazing and high-performance external doors are crucial in reducing your energy bill. The Centre for Sustainable Energy has produced plenty of information on this topic. Below are a few top tips from their website:
Doors
Changing your external doors to something more energy efficient is an excellent way of cutting energy costs. However, in many cases, all that’s needed is proper draught-proofing. Simply filling in gaps can save around £60 per year (if you include windows), according to the Energy Saving Trust.
Pro Tip: When draught-proofing your doors, don’t forget the letterbox. This spot is one of the most significant sources of heat loss through a door!
If you’re considering changing your front door, look for a composite door made from a mix of uPVC, timber, and glass-reinforced plastic. These high-performance doors come complete with the frame, already sealed and weather tight.
Windows
There is only so much a DIYer can do to improve the performance of their windows.
There are types of secondary glazing that you can install without significant expense. However, some are much better than others, so it’s worth shopping for a high-quality system that fits your budget.
As with doors, ensure your existing windows are fully draught-proofed before spending a lot of money replacing them.
Sometimes the seal breaks around a double-glazed unit, resulting in a misty look. Not only is this unsightly, but it will also affect the window’s energy rating. You can fix this issue using one of the many specialist companies advertising this service.
Consider changing the glass to a low-emissivity (low-E) type. This glass has a thin metal-oxide coating that reflects heat while allowing light to pass through.
Some double and triple-glazed units have argon gas in the gap between panes, which has a better R-value than air.
If the frames are sound, you can change the glass without too much trouble. If not, consider replacing the lot.
Modern frames are made of thermally efficient materials with integral thermal breaks which prevent heat transfer through the frame itself. Fitting these frames is a job for professionals.
You must also consider condensation. By closing off all pathways for heat to escape, you also prevent air from entering the building. The key is to control the airflow into your house using trickle vents in windows.
Conservatories
Having a conservatory that you’re not heating can be beneficial. I.e. the glass wall enclosure and roof help insulate the connecting wall if you close off the conservatory during cold weather.
For those who like to sit in a conservatory, even on cold days, there are still things you can do to cut down your heating bills.
- Ensure your glass is as efficient as it can be.
- Add secondary glazing, blinds, or thick curtains.
- Change the roof from glass to tiles and introduce a layer of insulation.
Step 4: Roof
Pitched Roofs
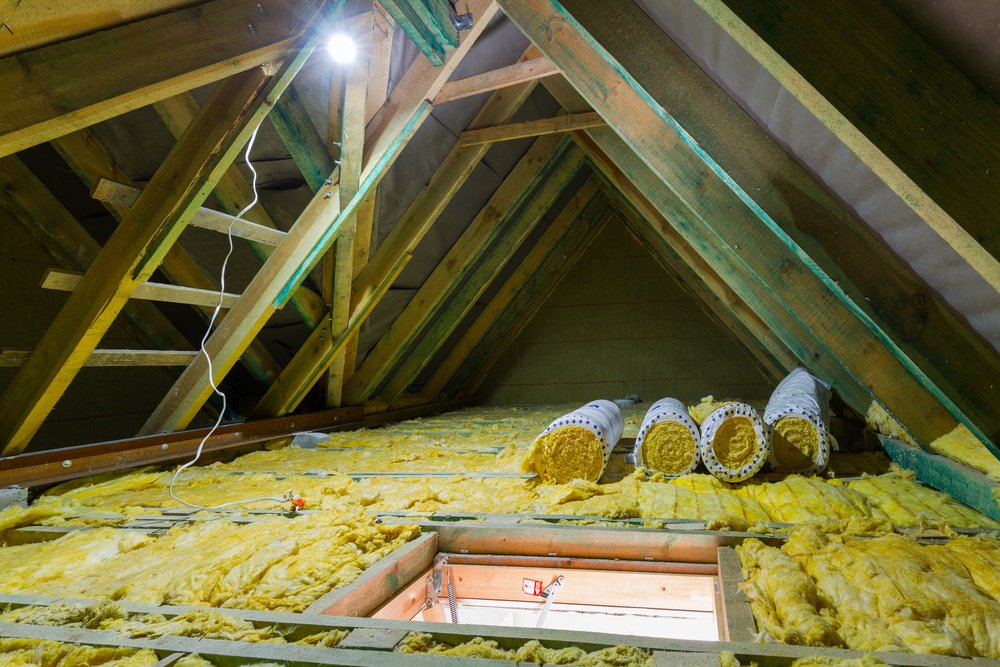
If you have a pitched roof with an accessible void above the ceiling (loft or attic), you have several cost-effective options.
The most common way of insulating your loft space is to lay a glass fibre or mineral wool quilt between the ceiling joists and another layer across the joists.
When adding insulation to the loft space, you must be careful not to create other problems. The tendency is to tuck the insulation into the eaves, which cuts off the airflow pathway. However, if you don’t do that, you could get a cold bridge where the loft insulation stops short of the cavity wall insulation, resulting in staining.
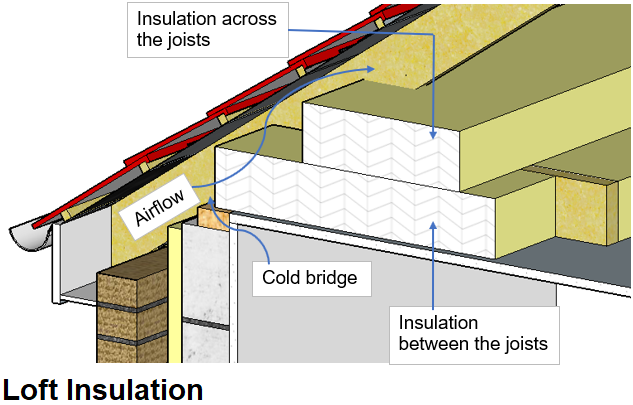
To overcome the problems caused by still, moist air, fit roof vents on the cold side of the insulation and install condensation traps around vent pipes.
In older houses without felt underlay (the layer of material fixed between the rafters and the battens), spray foam insulation is a good option.
Spray foam reduces heat loss through the roof tiles and binds them together, holding them in place. A word of warning, though — don’t rely on this to make your roof watertight. You must first fix/replace any loose/broken tiles.
If you had your loft insulated 20 or 30 years ago, don’t assume it’s still good. Standards were much lower back then, and the 50mm fibreglass is probably powder now. Check out our guide on how long loft insulation lasts to learn more.
Pro Tip: Don’t forget your pipes. These must be insulated if they are above the insulation layer to avoid water pipes freezing in the winter. The same goes for any water tanks or cylinders.
If you want to use your loft as a room at some point, you can fit the insulation between the rafters. You may need netting or battens to hold it in place, or you could line it with plasterboard.
For more tips on installing loft insulation, check out the video below from Homebuilding and Renovation:

Flat Roofs
Flat roofs are more challenging because the choices are limited, and access can be problematic.
The two primary options are to insulate the underside or to add rigid insulation above the roof covering.
Insulate the underside
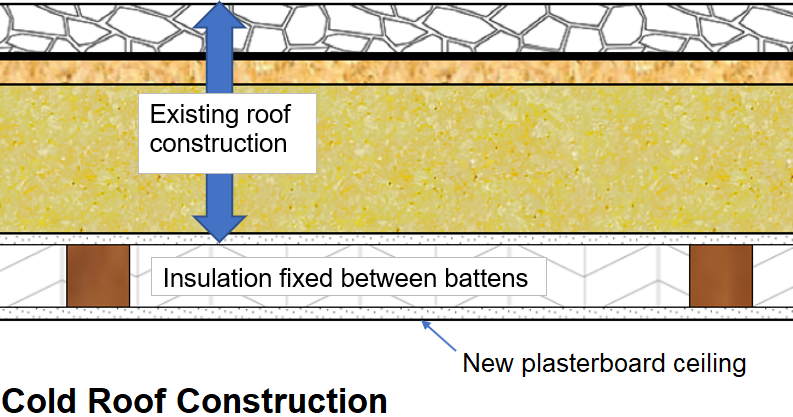
This method is known as cold roof construction and involves fixing polystyrene tiles or similar lightweight insulation to the ceiling.
This approach was common practice in the 1970s when the first oil crises hit, and energy costs went through the roof (pun intended). However, 20 years later, homeowners removed them because they presented a fire hazard.
To avoid fire safety issues, batten out the ceiling first, and fix the insulation between the battens and plasterboard below. This method is also great for hiding unwanted Artex finishes and damaged ceilings.
Insulate the top
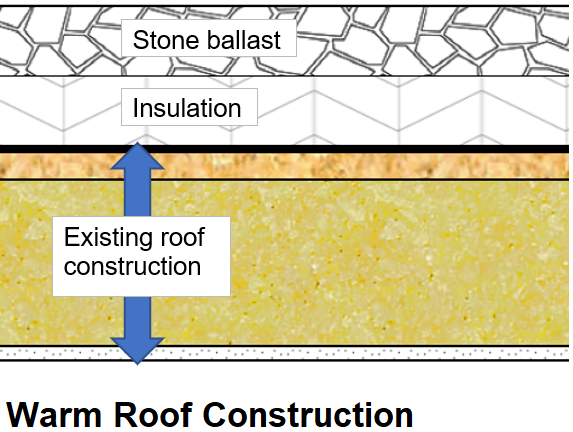
This method is known as warm roof construction, where you lay the insulation on top of the roof covering.
First, remove any stone chippings on top of the roof to expose the roof covering. Inspect the covering and carry out any repairs before laying down the insulation board.
To stop the insulation boards from flying off in high winds, lay 50mm of loose stone over them.
Final Thoughts
As we’ve seen in this guide, many options are available when insulating your house. Some might not be practicable, but there is always something you can do to improve your home’s energy efficiency.
Some of the work you can do yourself, but you’ll need a specialist for the larger projects. For contractors in your area, check out Rated People.
Pro Tip: Some energy providers offer free insulation or assistance through the government’s Energy Company Obligation (ECO) Scheme. To determine if you qualify, read this handy Which? report.
I’ll finish with one more energy-saving tip that won’t cost you a penny. If you have a condensing boiler, drop the temperature of the water flowing out of the boiler to 60⁰C, the temperature at which the boiler condenses water vapour. This adjustment enables it to recover heat, which would otherwise disappear up the flue. You’re welcome 🙂
Insulation Materials
Here’s a list of insulating materials with examples of where you’d use them.
| Material | Type | Floor | Walls | Doors/windows | Roof |
|---|---|---|---|---|---|
| Glass fibre | Quilt | Under | Internal | Pitched | |
| Mineral wool | Quilt | Under | Internal | Pitched | |
| Mineral wool | Batts | External | |||
| Spray foam | Can | Edges | Draught proofing | ||
| Expanding foam | Tape | Edges | Draught proofing | ||
| Polyurethane (PU) | Rigid foam board | Below | Internal | Flat | |
| Polyisocyanurate (PI) | Rigid foam board | Below | Internal | Flat | |
| Expanded polystyrene (EPS) | Rigid foam board | Above or below | Flat | ||
| Expanded polystyrene (EPS) | Beads | Cavity | Pitched | ||
| Loose-fill cellulose | Bag | Pitched | |||
| Reflective foil | Roll | Above | Internal | Pitched or flat |

