Unsightly pipes can ruin your home’s decor. Well, unless you’re opting for a trendy industrial vibe!
Pipes covered in layers of thick paint or messy pipework sprawling across a wall can become eye-sore. Fortunately, if you want to hide your pipework, you don’t need a plumber to relocate them.
There’s a much simpler, DIY-friendly solution. I.e. build a ‘box’ that conceals the pipework so it’s neatly hidden away. When done properly, this boxing blends into the wall and is barely noticeable.
Tools & Materials
Gather all the tools and materials below before I show you how to box in pipes.
Tools:
- Tape Measure
- Pencil
- Wood Saw
- Spirit Level
- Drill
- Screwdriver
- Caulking Gun
Materials:
- Scant Timber Battens
- Wall Plugs
- Screws or Nails
- Poly-filler
- Sandpaper
- Caulk
There are several ways to box in unsightly pipework. The method you choose will depend on where your pipes are located.
In this guide, we have two tutorials for you; one for vertical pipes located in the centre of a wall and one for vertical pipes in the corner.
Method 1: Boxing-In Pipes
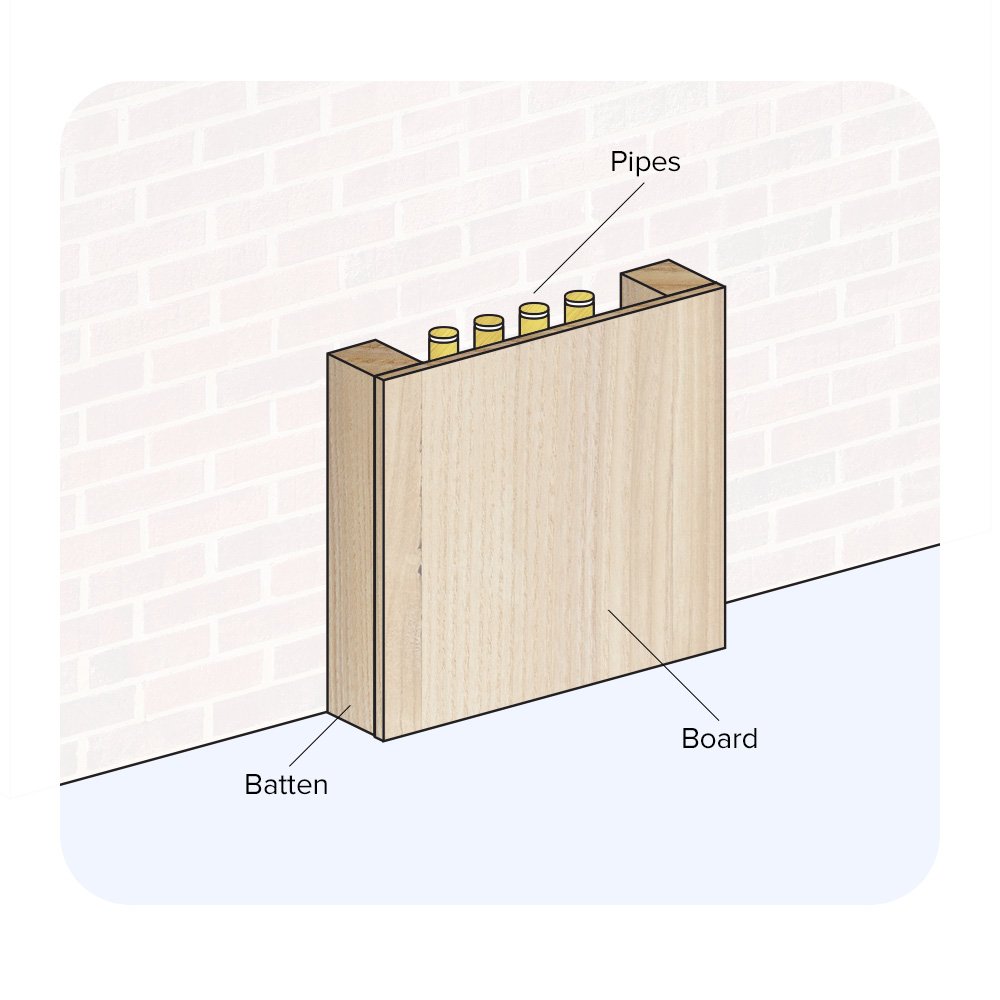
This method is most commonly used for boxing in pipework in the middle of a wall or underneath a boiler. The only requirement for this method is that you have room on either side of the pipework to fit two single battens. If your pipes are butted into the corner of the room, you’ll need to follow method 2.
1. Measure How Far the Pipes Protrude from the Wall
You first want to measure how far the pipeworks you’re trying to conceal protrude from the wall, as this will determine how ‘chunky’ your boxing will need to be.
Hold the end of a tape measure against the wall and measure the distance from the edge of the pipe to the wall. We always recommend taking several measurements throughout the length of the pipework, as it may not be consistent.
The largest measurement is the one you’ll want to work with, and we recommend adding an extra few mm on top. You don’t want your boxing to touch the pipes, as this can cause a rattling or tapping noise when the pipes are in use. Buy some timber battens that are equal to, or greater than, this measurement.
Example: If your pipes stick out 5cm from the wall, add another 5mm for some additional room within the boxing, and you’ll then have a total measurement of 5.5cm. With this measurement, you now know you want to buy battens 5.5cm or more in width.
2. Measure the Length of the Area you Wish to Box-in
The next step is deciding on the length of your boxing. Let’s say you’re looking to box some pipework in from the floor to the ceiling in the centre of a room. Take the whole measurement of this length from the floor to the ceiling. If you’re looking to box pipes underneath your boiler over a worktop in the kitchen, measure from the bottom of the boiler to the top of the worktop.
3. Cut Timber Battens to Size
Using the above measurements, cut the battens to size. You need two identical lengths of battens, as these are fitted on either side of the pipework.
4. Affix the Battens
To affix the battens into position, drill several holes through each batten. Then, holding the batten in position, re-drill these holes in the wall.
Ensure your batten is spirit-level straight, and try to fit your battens as close to the pipework as possible.
Once you’ve made several holes, add wall plugs into the wall and screws through the front of the batten to secure it against the wall.
5. Cutting the Front Board to Size
After you’ve fixed both your battens, the only thing left is installing a board over the top to conceal your pipes.
You can use MDF, plywood or even plasterboard for this part. Remember that the thickness of the board you’re using affects how much the boxing protrudes.
The width should match the distance between the two battens you’ve installed, and the height should match the length of the battens. Using these two measurements, cut the board to size using a saw.
6. Fitting the Board
To secure the board, nail or screw it to the battens. Whichever option you use, secure it with several fixings across the length of the batten.
If you’re using screws, recess the heads beneath the board. If you’re using nails, use a hole punch.
Add two further boards to either side of the battens if you wish. These extra boards will provide a consistent finish to all three sides of the boxing. However, it isn’t necessary if your battens are smooth and you plan on painting them.
Pro Tip: To easily access your pipework, use double-sided velcro attached to the front board and batten. This way, you can remove and replace the board when required.
7. Fill Over Screw Holes and Caulk Along the Join
Apply a small bit of filler over the top of your screw heads or nails, and once this has dried, sand it smooth with the rest of the board.
Once the boxing is painted, your fixings won’t be visible. You can also caulk the edges between the board and the batten, so there is no visible join. Once painted, it should appear as one whole piece.
And that’s it; your pipes are now fully concealed!
Method 2: Boxing-In Corner Pipes
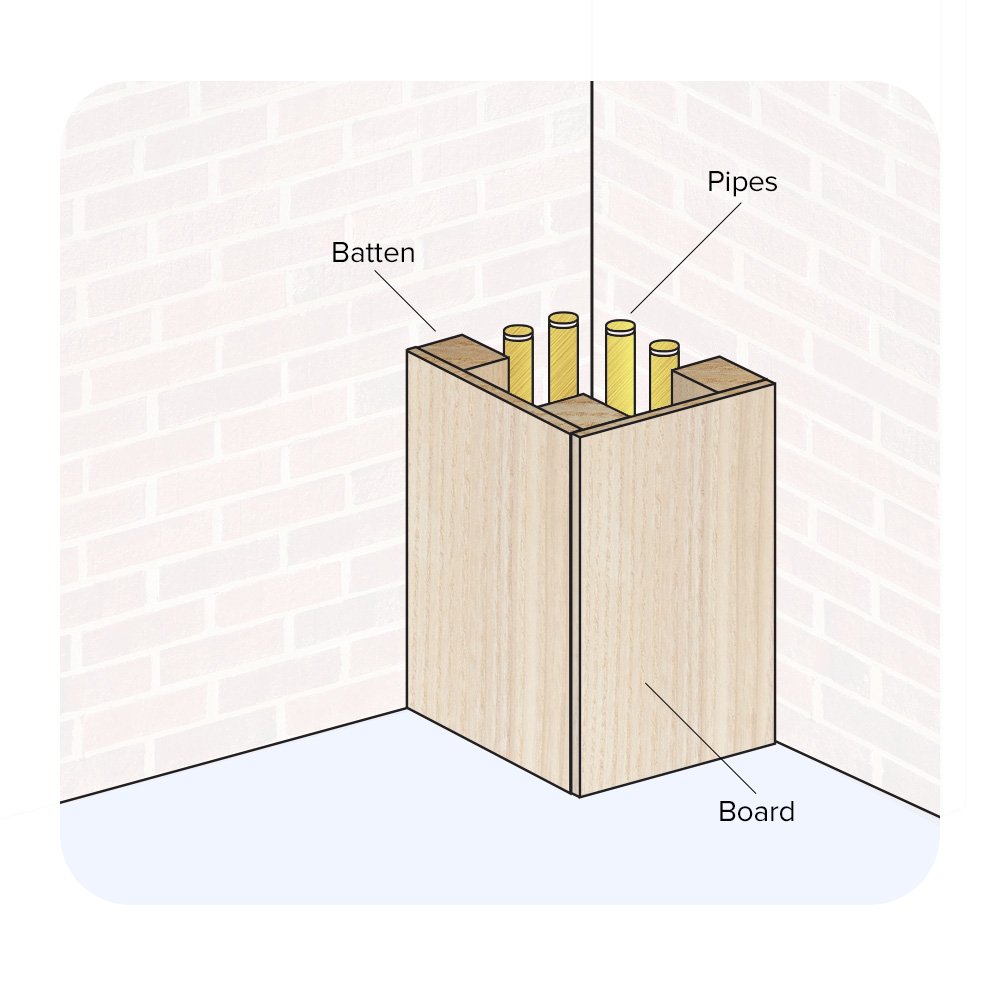
This method is for corner boxings, where the pipework is located within a corner, and there isn’t room to fit two battens on either side.
1. Measure the Length of the Area you Wish to Box-in
Using a tape measure, measure the whole length of the pipework you wish to box in.
2. Cut Timber Battens to Size
For this method, you need three timber battens. Mark your measurements on all three lengths of battens and cut to size using a saw.
3. Affix Two Battens to the Wall
The first two battens must be secured to each wall around the pipework, one on either side. Install them as close to the pipework as possible so your boxing isn’t bigger than it needs to be.
Drill several holes into the battens, hold the batten against the wall (making sure it’s spirit level straight) and re-drill them on the wall. Once done, add some wall plugs and screw the two battens to the wall.
4. Cutting the First Board to Size
To cut the first board to size, measure from the inner corner of the wall to the far edge of one batten. Check this measurement is consistent throughout the whole length of the batten. If it isn’t, take the largest measurement as the board’s width and scribe the cut afterwards for a perfect fit. The video below explains how to scribe:

The board’s length must match the length of the batten. Now you have both measurements, cut the board to size using a saw. This board will become one side of the box.
Pro Tip: If you plan on using your boxing as a ledge or a step, use thick plywood boards that are strong enough to take the weight.
5. Fitting the Corner Batten
Now you have one board cut to size; you can attach the third and final batten. It’s much easier to install the third batten before you fit the first board, as it fits to the back of the first board.
Position the third batten flush against the first board’s edge and screw or nail it onto the board.
6. Fit the First Board
To fit the first board, position it along the batten you measured in step 4 and butt it up against the wall. Ensure the batten is inside the boxing, closer to the pipes. This batten will become the inside corner of the boxing.
To attach the board, screw or nail it in several locations to the batten measured in step 4.
7. Cutting and Fitting the Second Board
Now you have one board cut to size and secured in place; you can measure the second board. Measure from the edge of the first board to the opposite wall, where the other batten is affixed.
Take multiple measurements along the length of the batten again, and if needs be, scribe the cut for a perfect fit.
Once the second board is cut, screw it onto the corner batten and the batten affixed to the wall.
8. Fill Screw Heads and Caulk Along the Joins
Counter-sink all your screw heads and nails and fill them with an all-purpose filler.
Once the filler has dried, sand it smooth, add some caulk along the joins where the boards meet and paint the whole boxing. All the joins and screw-heads should now be concealed.
For a full video tutorial on boxing-in pipework using this method, please check out the video below:
Final Thoughts
You don’t need a plumber or a carpenter to conceal your unsightly pipes. All you need is a few timber battens, a couple of boards and this handy guide!
If you’re planning to conceal a boiler, check out our guide to boxing in a boiler.